
Rosa, from Pemberley Cup&Cakes, brings us today some delicious cream tartlets perfect for surprising your partner or guests. Also, it’s an easy recipe to make by following her instructions, so I definitely encourage you to make them at home!
Today’s recipe is an absolute luxury. But one of the best kinds —those that are within anyone’s reach and, practically, at any time. Could you start the day any better? These are, let’s say, decadent tartlets with a sablée pastry base (sweet shortcrust pastry), filled with pastry cream and crowned with a generous handful of fresh raspberries. And since we’re talking true luxuries, nothing better than one of the special varieties of Tiptree jam from La despensa de Claudia&Julia to elevate this delicious bite to a higher level: the apricot and armagnac jam will give them a unique, truly special touch.
As you can see, the mechanics of this captivating dessert are, although perhaps a bit time-consuming (some occasions really deserve that extra attention), fundamentally simple. But isn’t that usually the case in most situations? Sometimes, eager to surprise someone with something truly special, we get caught up in a frenzy to come up with the most dazzling idea —sometimes overly elaborate— convinced that this will completely impress them. And often, the answer was much closer than we thought.
And that’s what these attractive tartlets promise: simplicity and freshness, but also just the right touch of originality and a strong desire to seduce. It’s easy to imagine the palate that tastes them being deeply won over. Ours included. Let’s get to the recipe.
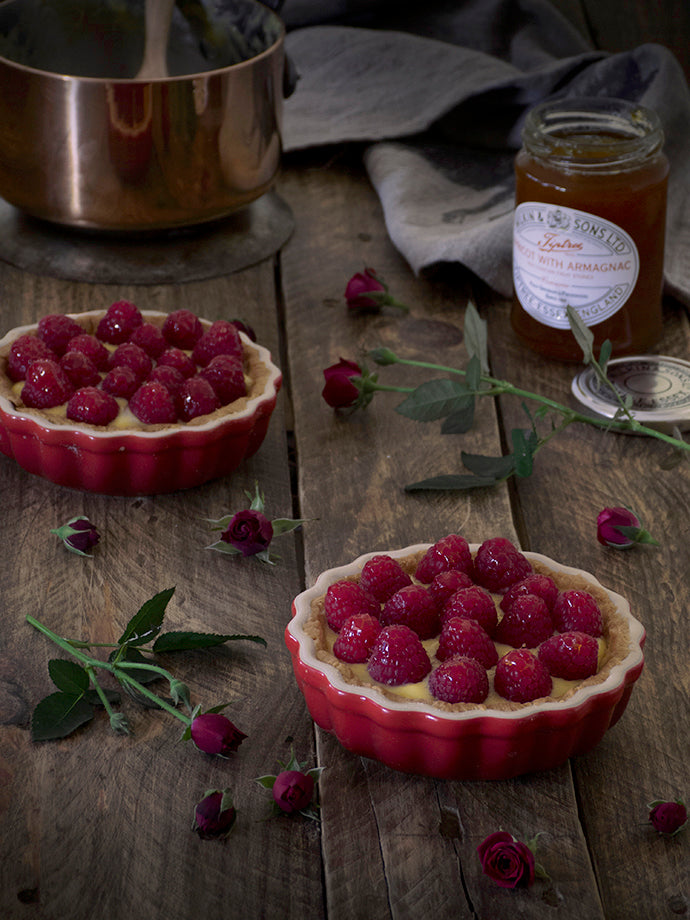
Le Creuset 11cm ceramic molds and Tiptree special jams with alcohol
Ingredients (for 4 11cmØ round tartlets)
All ingredients should be at room temperature, unless otherwise stated
For the sablée pastry (sweet shortcrust):
200 g all-purpose wheat flour (+ extra flour for rolling)
55 g powdered sugar
¼ teaspoon salt
125 g unsalted butter, very cold (even frozen), cut into small cubes (+ extra butter for greasing)
1 egg yolk (L)
For the pastry cream:
375 ml whole milk
1 teaspoon pure Bourbon vanilla extract from Madagascar
85 g granulated sugar
30 g fine cornflour (Maizena type)
3 egg yolks (L)
For decoration:
250 g raspberries
2 tablespoons (40 g) of apricot and armagnac jam
*1 tablespoon=15 ml ; 1 teaspoon=5ml*
Preparation
Preparing the sablée pastry:
1. Sift the flour together with the powdered sugar and salt into a large bowl and mix well with a whisk until all ingredients are fully combined.
2. Next add the cold butter, cut into small cubes, and incorporate it using your fingertips (avoid overworking to introduce as little heat as possible). You should obtain a sandy crumbly texture. Do not overmix, as you risk the butter softening and the flour’s gluten beginning to develop, which we don’t want, since the dough would end up with an elastic texture instead of the flaky one we’re aiming for.
3. Now add the egg yolk to the previous mixture and integrate it little by little in the same way as in step 2. Again, mix just enough to combine.
4. Once the yolk is well incorporated, bring the dough together with your hands (at first it may not seem so, but on contact with your hands it will come together and take shape) and form a ball. If it hasn’t softened too much, go directly to step 6. If the environment is warm and/or you’ve handled it too much, cover with cling film and refrigerate for at least 1 hour.
5. After this time, remove the dough from the refrigerator and, if it’s too hard, let it acclimate at room temperature for about 5–10 minutes.
6. Meanwhile, grease the insides of 4 11 cm Ø round tart molds (like these Le Creuset ones) with a little melted butter using a pastry brush.
7. Next, line the molds with the sablée dough, beginning by dividing it into 4 equal parts (a kitchen scale is very useful here) and forming a ball with each portion. At this point, we have two options for the next step:
- Slightly flatten each dough ball between your hands, place it in the center of each mold and begin pressing it with your fingers without stretching until it is evenly spread across the bottom and sides (it should slightly overlap the edges), smoothing as much as possible to achieve a thickness of about 0.5 cm. This is perhaps the simplest method, as it avoids cracking the dough from excessive handling.
- You could also roll each portion with a rolling pin on a lightly floured work surface and then transfer it to the molds once rolled out. Since this dough is very brittle, it’s best to place it between two sheets of baking paper or cling film and roll from the center outward until you get 4 circles about 0.5 cm thick. To make handling easier, fold half the dough over the rolling pin, unfold it over the mold and press to fit the shape of the container. The good thing about this dough is that it’s very workable and can be gathered and re-rolled as many times as needed.
7. Next, run a knife along the edge of each mold to trim the excess dough and neaten. If any cracks appeared during the previous step, repair them with the remaining trimmings (they seal perfectly with your fingers).
8. Before baking, prepare the tartlets for perfect baking. Again, there are two options:
- Prick the base of the dough repeatedly with a fork, cover with cling film and refrigerate for about 10–20 minutes until the dough firms up. Then completely cover each tartlet with parchment paper (it’s better to scrunch and smooth it first so it fits the mold’s interior) and fill almost to the edge with baking ceramic beads (or, alternatively, some type of legumes such as chickpeas, beans, lentils, or even rice).
- Cover the tartlets with cling film and place them in the freezer for 30 minutes. After this time, remove and cover the interior, base, and sides well with aluminum foil (discard the cling film), previously greased with a little butter on the shiny side (the side that will contact the dough). Then place the molds in the oven without adding any extra weight.
9. While waiting, preheat the oven (conventional electric, no fan) to 190ºC with top and bottom heat and set the oven rack to the middle position.
10. Finally, bake for about 20–25 minutes until the pastry reaches a nice golden color. Remove from the oven and place on a rack and, carefully to avoid burns, remove the weights and the parchment/aluminum according to the chosen method. In the latter case, the dough may have risen slightly; if so, gently smooth it with the back of a spoon while still hot.
11. Let cool completely in their molds on a rack before filling.
Preparing the pastry cream:
1. Place the milk in a saucepan and bring to a boil over medium heat. Remove from heat and set aside.
2. In a medium bowl, using a whisk, beat the yolks together with the sugar until the mixture lightens and becomes thicker and fluffy.
3. Next, add the fine cornflour to the egg and sugar mixture and continue mixing until everything is perfectly combined.
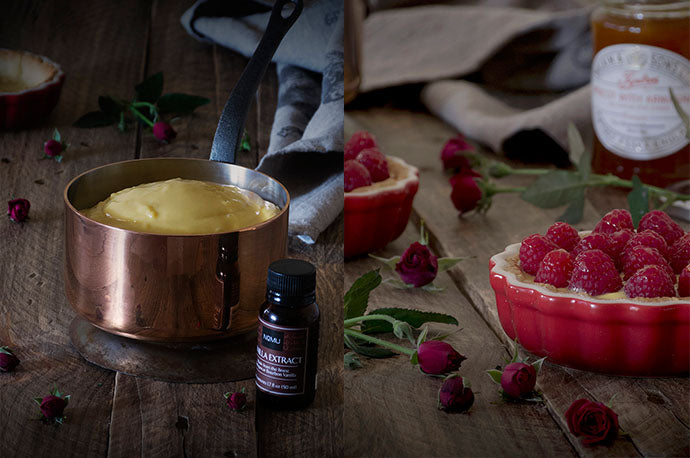
Madagascar vanilla extract, De Buyer copper saucepan and Le Creuset 11cm ceramic molds
4. Then slowly pour half of the hot milk over the previous mixture while whisking continuously to prevent the yolks from curdling.
5. Once well combined, pour it into the remaining milk and return to low heat until the mixture thickens, stirring constantly with the whisk so no lumps form and it doesn’t stick to the pan (it takes me about 10–12 minutes; note that it will thicken a bit more as it cools).
6. Remove from heat, add the vanilla extract, whisk again until combined and cover with cling film, pressed directly onto the cream surface to prevent a dry skin from forming and to avoid condensation from the heat. Let cool completely at room temperature.
7. Before using, whisk it again just enough to make it smooth and creamy (if you overmix the already cold cream, lumps may appear). Once cold, keep refrigerated in a tightly sealed container while not in use. It keeps in the refrigerator in an airtight container for up to 3 days.
Assembling the tartlets:
1. Fill the cooled sablée bases of the tartlets with the pastry cream up to ¾ of their capacity and smooth the surface with the back of a spoon.
2. Then arrange the raspberries close together on the cream surface, pressing lightly so they stay in place but not so much that they sink or the cream overflows.
3. Warm the jam in a small saucepan over low heat (or in the microwave at medium power for a few seconds) until it becomes liquid, strain it to remove any lumps and brush it over the fruit with a pastry brush.
4. Serve immediately.
Once assembled, the tartlets can be kept refrigerated for up to 2 days. Remove them from the fridge half an hour before serving to let them come to temperature.
Notes:
- Another common alternative to vanilla extract is to use a vanilla pod. When heating the milk, flavor it by adding the vanilla pod split lengthwise with the tip of a sharp knife. If you don’t want the seeds visible in the cream, strain the milk before proceeding with the rest of the ingredients (I usually use a coffee filter, because the seeds are really tiny).
- Gather the leftover dough after trimming the edges and form a ball (it won’t be much, but you never know — you might want to make some cookies later); wrap it in cling film and freeze. It keeps frozen for up to 2 months; to defrost, simply leave it in the refrigerator the night before.
- Besides raspberries, you can use a wide range of fruits for these tartlets, from other berries to stone fruits (cherries, plums, peaches, apricots, etc.). In the latter case, cut them into pieces and remove the pits.
- Instead of 4 individual tartlets, you can use this same recipe to make a single larger tart. The Le Creuset 24cm Ø ceramic tart mold is simply perfect!
- If you prefer, you can finish decorating your tartlets with a little powdered sugar right before serving.
I hope you like it. Best regards.
Rosa


