
I bring you a kitchen basic, roasted garlic , an essential preparation both to enjoy as is and to enhance the flavour and result of any dish in which you use it. Both roasted garlic and the oil in which we will store it! Making roasted garlic is very easy and basic. Here you will find how to make roasted garlic , how to use it in your recipes, and also ideas to take advantage of the wonderful oil flavoured with roasted garlic that results from preserving roasted garlic in oil.
Once you discover the flavor and value of roasted garlic, you will no longer forget to put a head of garlic or two in the oven every time you turn it on for anything.
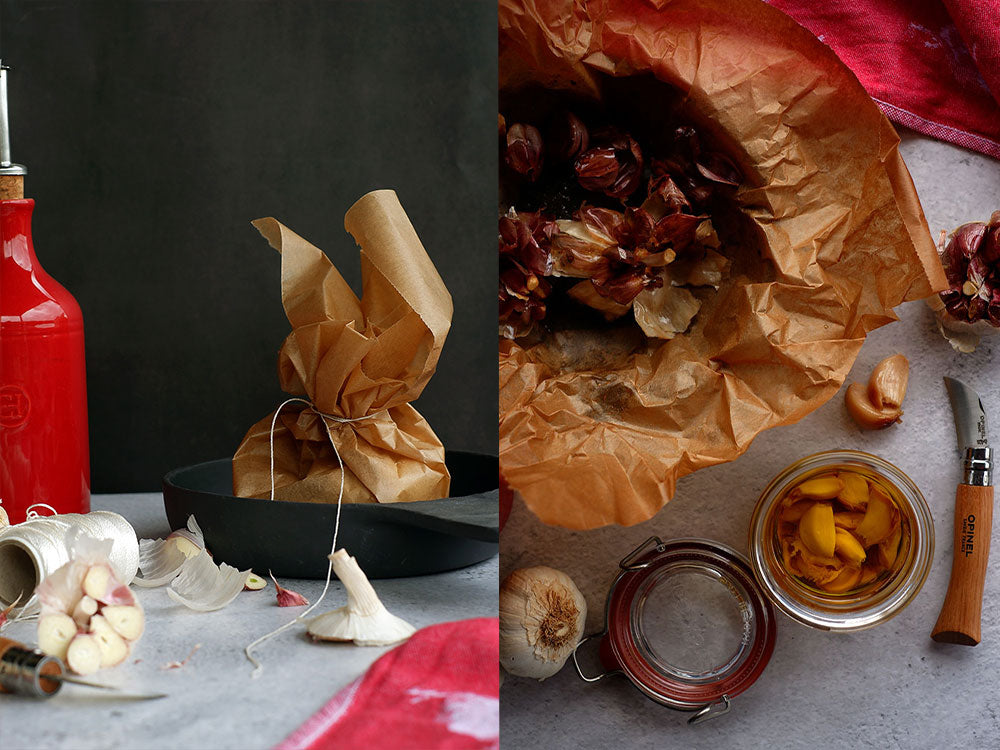
Roasted garlic is made in a kind of bag, cooking it en papillote in its own juice, which is why it is so soft and tasty. Roasted garlic is very tender , in fact it almost looks like butter, it doesn't repeat itself but it is intense in flavor. A flavor that moves between roasted with caramelized and smoky touches , and therefore will help intensify the flavor of any recipe in which you use it. I hope you are encouraged to try them with the ideas we bring.

Recipe for roasted garlic preserved in oil
- Preheat the oven* to 160 - 185 ºC*
- Arrange the garlic bulbs you are going to roast on a wooden board. Cut the ends off the garlic bulbs with a sharp knife, leaving the garlic visible.
- Open a few sheets of baking paper (or aluminium foil if you don't have one), and place the garlic bulbs inside. Pour a little oil into each bulb, spraying all the garlic. Then sprinkle salt on top.
- Tie the papers with kitchen string, making little packets or bags. Place them on a tray and put them in the oven.
- Baking time will vary depending on the heat of the oven and the size of the garlic, but they will be ready in about half an hour, or even a little less.
- After the time has passed, remove from the oven and open the packages to allow them to lose heat.
- Once you can handle them, remove the garlic cloves from their heads. If they are done, you will see that by pressing on the bottom of the garlic and sliding upwards they will come out very easily.
- Place all the garlic cloves in an airtight jar ( Luigi Bormioli's are wonderful) and fill it with olive oil, covering the garlic. Close the jar and store it in the fridge until you want to use it.
Grades:
- *Garlic takes up so little space that it's worth preparing it when you're baking a cake or when you're roasting vegetables or fish in the oven - there's always room for some roasted garlic, and you'll save on energy.
- There are people who do not cut the ends of the garlic, they do it as is. By cutting the ends you ensure that they will not explode with the initial heat and, especially, it makes the task of removing them very easy.
- Garlic in oil will keep perfectly for two months (and more).
- Some people turn garlic into a paste and, together with the oil, fill an ice cube tray to keep it in the freezer. They will keep forever, and when you want to use them you can take out the cubes you need and put them in the pan. When hot, the cubes will dissolve in no time and you will have the flavoured oil and garlic ready to cook.
- Remember that the longer the garlic is in the oil, the more aroma the oil will acquire (and you can use it in many ways, I'll tell you more below).
Revol slate casserole and Gefu kitchen thread
Note for the lazy on how to make roasted garlic:
You can also make roasted garlic as is, loose on a tray, sprinkled with oil and salt. The biggest danger is controlling the baking time: very often they end up dry and too dry because they are cooked too quickly and the air in the oven dries them out. This way they lose that pleasant and classic creaminess of roasted garlic, but if you are in a hurry or lazy you can put them on the tray as is. Of course.

Opinel garlic knife and Nordic Ware Naturels trays
How to use roasted garlic
Roasted garlic is tender and even spreadable in texture, and has smoky, but also caramelized and sweet notes in flavor. Take advantage of it in countless dishes, I assure you that it will turn a dish into a great dish:
Eat it as is: you can serve it as a snack, alongside meat or fish, roasted garlic delights everyone who tries it.
- For a snack : stick it with a little cheese, a piece of ham, or a piece of tortilla... it will be a mini pincho, a delicious mini-pincho!
- To spread on bread : whether toasted or soft bread, spread garlic on the bread and eat it as is or place some sausage, salami, chicken or sardines on top. It will be a perfect dinner.
- For creams : add some roasted garlic to your usual creams, blend them and you will see how the flavour changes. A cream of mushrooms, pumpkin, leeks, cauliflower... Add roasted garlic and you will discover a new world!
-
Use it in gazpacho instead of using raw garlic, this way it won't repeat.
- In purees : you can add one or two cloves of garlic to mashed potatoes or vegetables, this will enrich them.
-
Try it when you make hummus and also in olive paste . Replace the raw garlic with two or three roasted garlic cloves. You will love the touch it gives.
-
Use it together with the oil to prepare a different aioli , which will surely surprise you (and serve that aioli to accompany the roasted potatoes, hhmmm!).
- For cocas, toasts and pizzas : as you add olives or peppers, add roasted garlic to these preparations, the roasted and smoky touch is fabulous in them.
- In stews and casseroles : add a couple of cloves of garlic to your stews, you will see how they add an unusual flavour that you will love.
- Grilled meats and fish : add a few cloves when you are grilling any food, they will melt in the juice that covers the food and the result is extraordinary. If any of them remain intact even after that second grilling, the smartest ones will eat them.
- To make croquettes : add roasted garlic to your croquette mixture, you will see how much you appreciate it. Likewise, for the bechamel sauce for cannelloni if you want it with a different touch.
- For the filling of empanadas or the filling of fresh pasta : when you prepare the filling for your ravioli or small bags and to make empanadas, remember the roasted garlic you have in the fridge. Add it to these fillings because it will give them a delicious different touch.
How to use roasted garlic oil
The oil that preserves roasted garlic takes on the flavour of the garlic, it is intensely aromatic. It will solidify in the fridge, but it will quickly return to its liquid state if you remove it from there or spoon it into the hot pan. Remembering this, use it whenever you can. It is rich in flavour (what am I saying, it is a wonderful oil!)
- For bread, toast and sandwiches : sandwiches with cheese and cold cuts are fine, but with the flavour of roasted garlic oil they are superior.
- For grilling: When grilling fish or meat, use roasted garlic oil before putting the food on the grill. You'll see what an easy way to add flavor! You can also brush the meat directly with the oil, which will ensure that the entire piece tastes delicious.
- For pizzas and focaccias: It won't be a spicy pizza oil, but it will be a garlic pizza oil that will change every bite you take for the better.
- For pasta: use a splash of roasted garlic oil to season your pasta dishes, you will love the result. You can also use it in these doughs as an oil in the process of making the dough (what a twist you will give it in flavor!).
- For vegetables, sautéing mushrooms and grilling corn on the cob : pour a few tablespoons of roasted garlic oil into the pan or grill when roasting or sautéing them, or brush them directly before grilling. You'll see!

I hope you'll be encouraged to put a few heads of garlic in the oven next time you turn it on. Your life will change for the better when you always have a jar of roasted garlic in the fridge!
NOTE : One of the reasons we have introduced the Naturels Nordic Ware trays in the store is to bake small foods or foods that you are going to make in small quantities. These small trays are super practical for roasting garlic, making a little onion in the oven, preparing some spaced out chickpeas in a flash, roasting some peppers or making escalivada... The juices are collected, you can separate flavors, place the tray in the oven while you bake other things... I hope you find them very practical!


Comments
ISABEL said:
Buenos días. Que receta más fantástica! Se podría sustituir el papel de horno por una bolsa de asar? O no quedarán igual? Muchas gracias. Besos
Isabel said:
Otra forma más de consumir ajos. 😋Buenísimos. Gracias por la receta.
Annabel said:
Pero cuando dices de hacer un corte, a qué te refieres?? Si mantenemos la cabeza para asar, dl corte donde lo haces?? Arriba de la cabeza pero sin abrirla?? Por la parte inferior tambien lo cortas? Gracias por la información. Saludos
Claudia said:
Muchas gracias, MAria, me alegro mucho! ¡Saludos!
Maria said:
Me encanta!
Claudia said:
Hola Liliana, tienes razónq ue tal vez no esté bien detallado, disculpa y gracias por comentarlo, ahora lo revisaré en texto. Pero la idea es que se tienem que quitar los ajos de la cabeza de ajos y yo ya los retiro de su piel: como están blanditos y la tapita de los ajos está cortada, solo “escurriéndolos desde la base” van saliendo y los guardas sin piel en el frasco, listos para usar.
Saludos y gracias!
Claudia said:
Hola Blanca, muy feliz de leer tus palabras, muy agradecida! Espero que te guste como para que siempre haya un botecito de ajos asados en la nevera . ¡Saludos!
Liliana said:
Me encantó la receta!!!
No obstante, tengo una duda respecto a la misma: En el punto 7, cuando hablás de extraer los ajos de su cabeza, te referís a sacarlos con su piel y todo? Y luego los disponés en un frasco también con su piel o se le quita en algún momento?
Desde ya, muchas gracias y un cordial saludo!
Blanca said:
Me encantan vuestras recetas, voy a empezar a llevar a la práctica. Mil gracias.