
The perspective of a good cheesecake homemade is always synonymous with a party and celebration at home, a real favorite in practically any of its forms and varieties. And to everyone's greater delight (this writer included), the latest happy discovery has been the acclaimed cheesecake Japanese, cotton cheesecake (in English) or soufflé Japanese (as it is precisely known in Japan): the recipe right away a super soft and fluffy cheesecake.
With such a preview, I'm sure you'll be able to start getting an idea of what's in store for you. Just as its various names suggest, this captivating version of cheesecake offers everything you love in a good cheesecake —its unmistakable flavor and creaminess as always—, but with a softness and a lightness beyond anything humanly imaginable, a texture like no other that caresses you from the first bite.
Unlike the popular cheesecake American (being the New York cheesecake one of the most highly regarded versions), el cheesecake Japanese is made with a lower proportion of cream cheese, even so, its presence remains unmistakable. Its main characteristic, however, is the incorporation of the egg whites, beaten separately into a light meringue, which gives it that extra fluffiness, softness and delicacy that will hardly go unnoticed. The amount of sugar used is also significantly reduced with respect to the first, but I assure you that you won't miss a single gram. On the other hand, in this case we won't see any crunchy cookie base either. To enjoy a cheesecake perfect Japanese, we will have to bake it, in addition, in a water bath. As you may already be anticipating, a true delight.

Le Creuset ceramic stand, Le Creuset jam jar and Laura Ashley porcelain plates.
As with the cheesecakes as usual, its time in the oven still faces the dreaded appearance of cracks or the center ending up sinking during or after the baking process. The most important thing here, besides mixing the ingredients properly, is to arm ourselves with a little patience (yes, I know, that’s probably the hardest part) and let it cool very gradually. Even so, if we follow the process with care, there won’t be cheesecake Japanese that can stand up to us, especially if we have quality utensils as reliable as the “PushPan” mold, springform, super nonstick and, above all, leakproof that I have used for this recipe. Shall we go ahead with it then? Don't forget to have all the ingredients ready before you start!
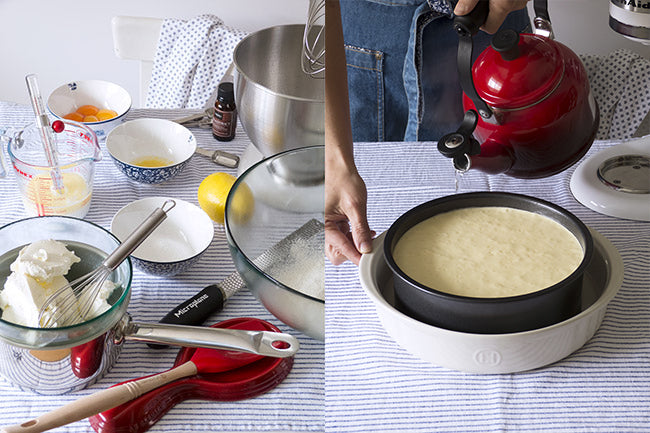
Kitchen Craft glass jug, Kitchen Craft cooking thermometer, Nomu vanilla extract, Laura Ashley porcelain bowls, Kitchen Craft measuring spoons, KitchenAid Artisan stand mixer, Microplane Premium Zester Grater, Mediterranean glass bowls, WMF wire whisk, Spoon spatula Le Creuset, Le Creuset Ceramic Spoon Rest, deep non-stick removable PushPan pan, Le Creuset Demi Teapot and Emile Henry round ceramic mold
Ingredients (serves 8-10 people)
All ingredients must be at room temperature, unless otherwise indicated
- 6 eggs (L)
- 65gr of cake flour
- 20gr of fine corn flour or cornstarch (such as Maizena)
- 100ml of whole milk
- 60gr of unsalted butter
- 250gr cream cheese (Philadelphia-style)
- 60 + 60gr of superfine sugar
- 15ml (1 tablespoon) lemon juice
- 2 teaspoons very finely grated lemon zest (only the yellow part)
- ¼ teaspoon of salt
- 1 teaspoon of pure Madagascar vanilla extract
- ¼ teaspoon cream of tartar (optional)
*1 tablespoon= 15ml / 1 teaspoon = 5ml*

Mediterranean glass bowls, spatula spoon and Le Creuset spoon rest, Laura Ashley kitchen apron, Laura Ashley kitchen towel and KitchenAid Artisan stand mixer
Production
- Preheat the oven (electric, no fan) to 160°C and place the oven rack in the lower position.
- Grease the inside of a non-stick round springform pan with a removable base, 20 cm in diameter and at least 8,5cm high, like this “Push Pan”, line the base with parchment paper so it matches its diameter perfectly and grease again over the paper. Set aside.
- For this recipe we will need the egg yolks on one side and the whites on the other, so we start by separating them while the eggs are still cold; this way it will be much easier to keep the yolks from breaking, since there must not be any small trace of them in the whites. Set aside separately (we will place the whites in a bowl spacious).
- In another large, separate bowl, we sift combine the cake flour and the cornstarch. Set aside.
- We slightly warm the milk together with the butter (I've done it in the microwave in a glass measuring cup for a few seconds at medium power, but you can use whatever method is most convenient for you), just until the butter melts into the milk. Set aside as well.
- Next, we place the cream cheese in a medium heatproof bowl over a double boiler on low heat, making sure the water doesn't touch the bottom of the bowl, and stir with some rods until it reaches a smooth, lump-free consistency.
- Then add the yolks, one at a time, stirring continuously with the whisk to keep them from curdling.
- Now add half of the superfine sugar (60gr) and continue stirring until dissolved.
- Next, while continuing to stir, gradually add the still-warm milk and butter mixture (no more than 50°C).
- Finally, we add the lemon juice and zest, the vanilla extract and the salt, and stir once more until you get a homogeneous mixture.
- We then remove it from the double boiler and, little by little, add it to the flour mixture we had set aside, while gently combining with a silicone spatula or wooden spoon until you get a light, lump-free batter. Set aside.
- With the help of some electric beaters or an electric stand mixer fitted with the whisk attachment, we start whipping the egg whites we had set aside, initially at medium speed until they begin to foam. We then add the cream of tartar (if we’re going to use it) and slightly increase the speed (there’s no need to go to the maximum because we don’t want a stiff meringue). As soon as the meringue’s little bubbles start to diminish, we add the other half of the sugar (the remaining 60gr), always gradually and without stopping whisking until we achieve a smooth, thick, yet somewhat light consistency.
- Next, fold the whipped egg whites into the cheese mixture in 3 additions, gently combining them with a silicone spatula using folding motions until the texture is uniform. Avoid overmixing so as not to lose the volume gained, which would result in a dense, heavy cake.
- We then pour the mixture into the pan (it should be at least 2 cm below the rim; there may be some mixture left over, but it’s best not to overfill it) and give the base a few taps against the countertop so the surface is level and any excess air bubbles trapped inside are released.
- Now we place our mold inside another larger oven-safe container (it can be a a dish or a tray with some depth) and we fill the latter with hot water until it covers the base of the former by at least 2 cm or so.
- We place the entire previous Set in the oven (pan + baking dish with hot water) and bake our cheesecake Japanese in its bain-marie for 65 – 70 minutes until it has visibly risen, the surface has taken on a nice golden color, and the center is almost set (it will still wobble a bit when you move the pan). Then turn off the oven and leave the cake inside with the door slightly ajar (I usually place the handle of a wooden spoon to keep it from closing) for another 30-45 minutes until you confirm that the center is fully set. You will also see that as it cools, the cake will lose some of the volume it gained during baking.
- Then we take it out of the oven; the first thing we’ll notice is that, besides losing some height, the cake will have shrunk slightly and will have released on its own from the sides of the pan. To unmold a cake or sponge perfectly when using a “Push Pan” like the one used in this recipe, we should follow a few very simple steps. Place the pan on a jar or similar object (something smaller than the inner diameter of the pan and a bit taller) and gently press the edges of the pan downward with both hands (the base with the cake will rest on the jar; you can see the sequence below). Next, cover with a large plate and flip onto the plate. Then remove the base of the pan and the parchment paper, cover with another plate or platter (the one where we plan to serve our cheesecake) and flip again (the golden side of the surface will be visible). Let it cool completely and refrigerate until ready to serve.
- When serving, we can sprinkle a little powdered sugar as decoration. To achieve a clean cut, it's advisable to use a knife long, smooth, and well-sharpened.
Keep refrigerated and well covered for about 3 days.

Deep non-stick removable PushPan cake pan and Laura Ashley kitchen apron
Notes
- For this recipe, it’s not advisable to use springform pans or any other type of pan with side seams. It’s very important to make sure the water from the water bath never comes into contact with the batter at any point during baking.
- You might also know this recipe as jiggly cake or jiggly sponge cake.
- If we use a good non-stick mold and grease it with a light film of mold release spray or butter, it won't be necessary to also line the inner side with parchment paper, which, on the other hand, would leave wrinkle marks on the sides of our cheesecake, which tends to shrink as it cools.
- If you find it hard to get superfine sugar, know that making it at home is as simple as grinding regular white sugar (you can use the chopper attachment on a blender, a coffee grinder, a food processor…). The idea is to reduce the sugar crystals so it dissolves more easily in batters and meringues, achieving a sublime texture.
- Cream of tartar is optional, but using it greatly eases whipping the egg whites and helps their volume remain stable once whipped. It is very important to make sure that the bowl in which we are going to whip them and the beaters we use are perfectly clean and free of grease or traces of yolk.
- Sudden changes in temperature significantly affect baked cheesecakes and especially our cheesecake Japanese, so It's important to let it cool down gradually inside the turned-off oven. If you don't do so, it will most likely crack or sink as it cools.
And now all that's left is for you to try it at home and enjoy one of the most exquisite bites, unbeatable for every lover of cheesecakes.


Comments
Yolanda said:
Hola, mi pregunta es la misma que la de Rebeca, el baño María es un recipiente en agua y este agua en un recipiente al fuego, como es que no toque la base del cuenco el agua?
Rebeca said:
Tras poner el queso en un cuenco al baño maría, “asegurándonos de que el agua no toca la base del cuenco”…. Sólo recibiría el calor que genera el vapor de agua?
No lo tengo claro, normalmente cuando es al baño maría ponemos un recipiente de menor tamaño sobre otro sírvanse al fuego y el agua que ponemos en éste último toca la base.
Enrique Mendez said:
Hola, tengo un a duda, el usar cremor tartaro me reduce la capacidad de dorar la perte superior?
Uso un hornonconvencional con solo calor abajo.
diana said:
20 cm de diametro y de altura cuanto, aparte como hago para que se dore en la parte superior
Claudia said:
Hola Carmen, Rosa usó uno de 20cm y con esas cantidades le va perfecto (puedes verlo en las fotos tu misma). Puedes usar otro más grande si quieres pero quedará algo más bajo (y creo que es interesante en esta tarta que quede algo alta, la hace más esponjosa y temblorosa) :) , pero el sabor será igual de rico. Un saludo!
Carmen said:
Es suficiente con un molde de 20 cm de diámetro?
Rosa said:
Hola Ana! Efectivamente, calor arriba y abajo a 160ºC.
Muchas gracias a ti por tu interés. Qué, te animas? :)
Rosa
Ana said:
Se pone con calor arriba y abajo o solo abajo ? Entiendo que a la misma temperatura que a la que se precalentó, es decir 160 .
Muchas gracias