
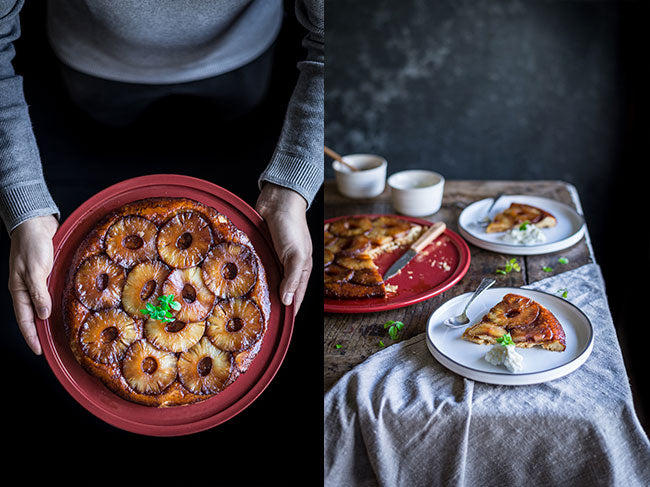
I admit I'm a bit of a sweet tooth, and desserts are my weakness — I like them all, come on! But even so I have my favorites and one of my top picks are fruit tarts, especially the Tatin tart, starting with the traditional apple version and ending with the one I'm bringing you today, the delicious pineapple Tatin tart.
I'm sure you've all heard of them, but in case someone doesn't know these tarts, I'll tell you that they are tarts with caramelized fruit and a pastry, which can be shortcrust pastry or puff pastry, and they have the particularity that they are baked upside down, that is the caramelized fruit goes on the bottom of the pan and we spread the pastry over it, which stays on top during baking, to turn it over when serving.
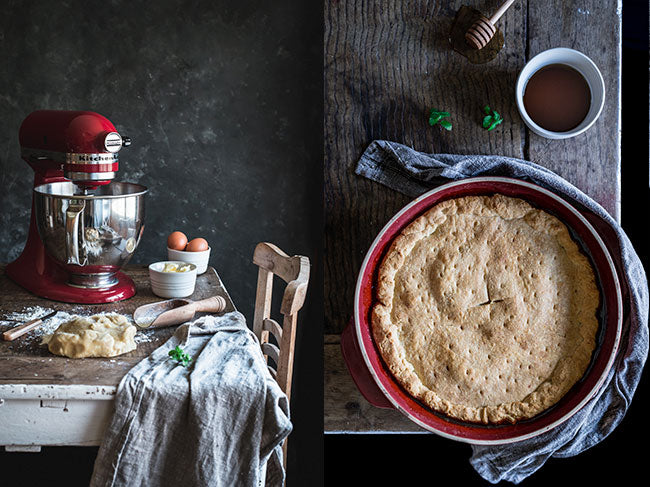
One of my tricks to make the tart truly delicious is to prepare it with a good homemade shortcrust pastry. In my opinion there's no comparison between homemade shortcrust and store-bought, no matter how good the latter is. Besides, I have no excuse, because if I make it in my Kitchen Aid it's really quick and convenient to make. I promise I take longer deciding to make it than actually preparing it!
I also have this beauty of a pan for Emile Henry Tatin tart, which is not only pretty but very practical, since it consists of two parts: the pan itself, which we can put on the stove to prepare the filling and then directly into the oven to bake the tart, and a plate to present the tart so it looks beautiful on our table.
Still not convinced? Well I can only insist again that not only is it easy to make, it's absolutely delicious! I assure you that the caramelized pineapple alone is incredibly good, but if we also combine it with the shortcrust pastry and that wonderfully buttery flavor… I am at a loss for words to describe it!! (And I promise leaving me speechless is not easy at all…)
Ingredients
For the pastry*:
- 225 g flour
- 2 tablespoons powdered sugar
- 150 g cold butter
- 1 large egg
- Zest of one lemon
For the filling:
- 10-12 pineapple slices
- 100 g sugar
- 50 g butter
- 1 tablespoon honey
- Juice of ½ lemon
*I indicate in the ingredients and preparation how to make the homemade shortcrust pastry, and that's how I find this tart tastiest. But if you're short on time, you can use refrigerated pie dough or puff pastry for a quick version of this recipe and you would only need to do the second part of the recipe.
Preparation
Preparing the shortcrust pastry:
- In a bowl sift the flour and mix with the sugar and lemon zest (you can zest the lemon using a grater like the one from Microplane)
- Then add the butter, cold and cut into pieces, and mix by rubbing with your fingers, without kneading, until you get a sandy texture.
- Add the egg, and work the dough as little as possible, just until the crumbs come together and form a ball. If the dough is too dry you can add a tablespoon of water, but only if necessary.
- If using the Kitchen Aid, attach the paddle and on speed 2 mix the flour, butter, sugar and lemon zest, only for the time necessary to obtain a sandy texture. Then add the egg and work the dough as little as possible, just until the crumbs come together and form a ball, adding a tablespoon of water if needed.
- Remove the dough from the bowl and, using a rolling pin, roll the dough out to obtain a sheet about 3 cm thick approximately, and with a diameter slightly larger than the pan.
- Wrap in cling film and refrigerate to rest for at least 30 minutes, although ideally about 2 hours.
Prepare the caramelized pineapple:
- If using fresh pineapple, start by peeling the pineapple, cutting it into slices and removing the central core, which is tougher (if you use the WMF pineapple corer, you can do these three steps at once, it's very handy!!)
- Then drain the pineapple, first in a colander, and then with a bit of kitchen paper, so it doesn't release too much water, which could overly soften the pastry.
- Place our Emile Henry Tatin tart pan over low heat with the sugar and lemon juice and let it dissolve until it forms a caramel, never stirring with a spoon, because if you do the caramel will crystallize.
- Once a light caramel has formed add the tablespoon of honey and the butter and leave on the heat for just a couple of minutes so everything integrates (now you can use a spatula or a wooden spoon to mix), taking great care that the caramel does not burn, as it would turn bitter.
- Next add the pineapple slices, covering the base of the pan with them (don't worry if some slices overlap slightly since they shrink a bit when baked and this way we ensure there are no gaps in the tart).
- Remove the pan from the heat.
- Preheat the oven to 180º.
- Next, if using fresh pineapple, place the pan in the oven for about 15 minutes so the pineapple cooks and loses its toughness.
- If using canned pineapple, it won't be necessary to cook it beforehand since it's softer, and the subsequent baking of the tart is more than enough to make it tender.
- Once the resting time for the dough is over (and after the pineapple baking time if you did that) remove it from the fridge and take off the cling film.
- Spread the dough over the pineapple already in the pan making sure it's well covered and tucking the dough well between the pineapple slices and the pan.
- Prick the dough with a fork and make a cross cut in the center to let steam escape so it doesn't soften the dough.
- Bake for 25-30 minutes, until the pastry is golden and the caramel peeks out from the edges of the pan.
- Remove the tart from the oven and run the tip of a knife around the pastry to release any parts that may have stuck to the pan.
- Let cool for 10 minutes so the caramel firms up and ensures better unmolding. Do not let it cool longer because otherwise the caramel will harden too much and make the tart stick to the pan.
- After 10 minutes, unmold the tart by turning the pan over onto the plate, as if flipping a Spanish omelette.
- Serve the tart warm or cold, accompanied, if desired, by a few mint leaves and whipped cream or a scoop of ice cream.
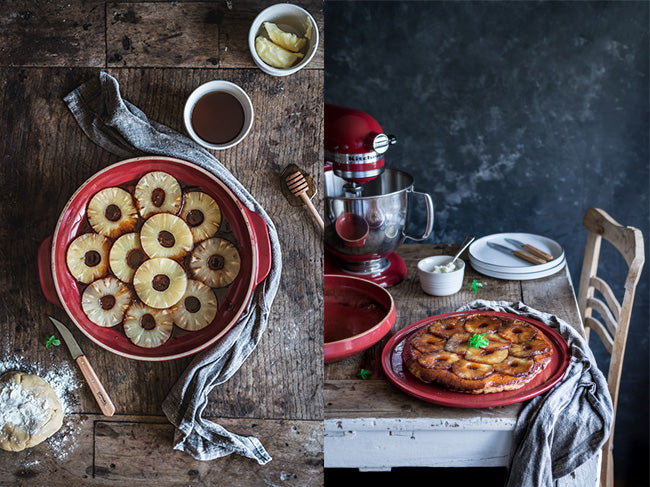
Emile Henry Tatin tart pan, Opinel fruit and vegetable knife and Bérard wooden honey spoon
Notes
- You'll see I recommend rolling out the shortcrust before resting it in the fridge, contrary to common advice, but for me it's much more convenient as it requires less effort. In any case you can do it whenever you prefer.
- For this tart you can use either fresh or canned pineapple, but if it's canned, choose pineapple packed in its own juice, not in syrup, as syrup would make the tart overly sweet.
- I indicate the number of pineapple slices approximately, since depending on their size you'll need more or fewer slices to cover the bottom of the pan.
As you see these types of tarts have no complication, and are very impressive, and when you make them you'll delight everyone, and you'll also look like a real cook.
And between us, if you're in a hurry and decide to make this tart with store-bought refrigerated pastry, I won't tell anyone, it'll be our secret.


Comments
Claudia&Julia said:
Gracias Pepi! Sí lo són, la verdad es que os animamos a hacerlo en casa. Saludos!
Pepi conde. said:
Me encantan vuestros utensilios son de gran calidad, y también vuestras recetas.
👍👍