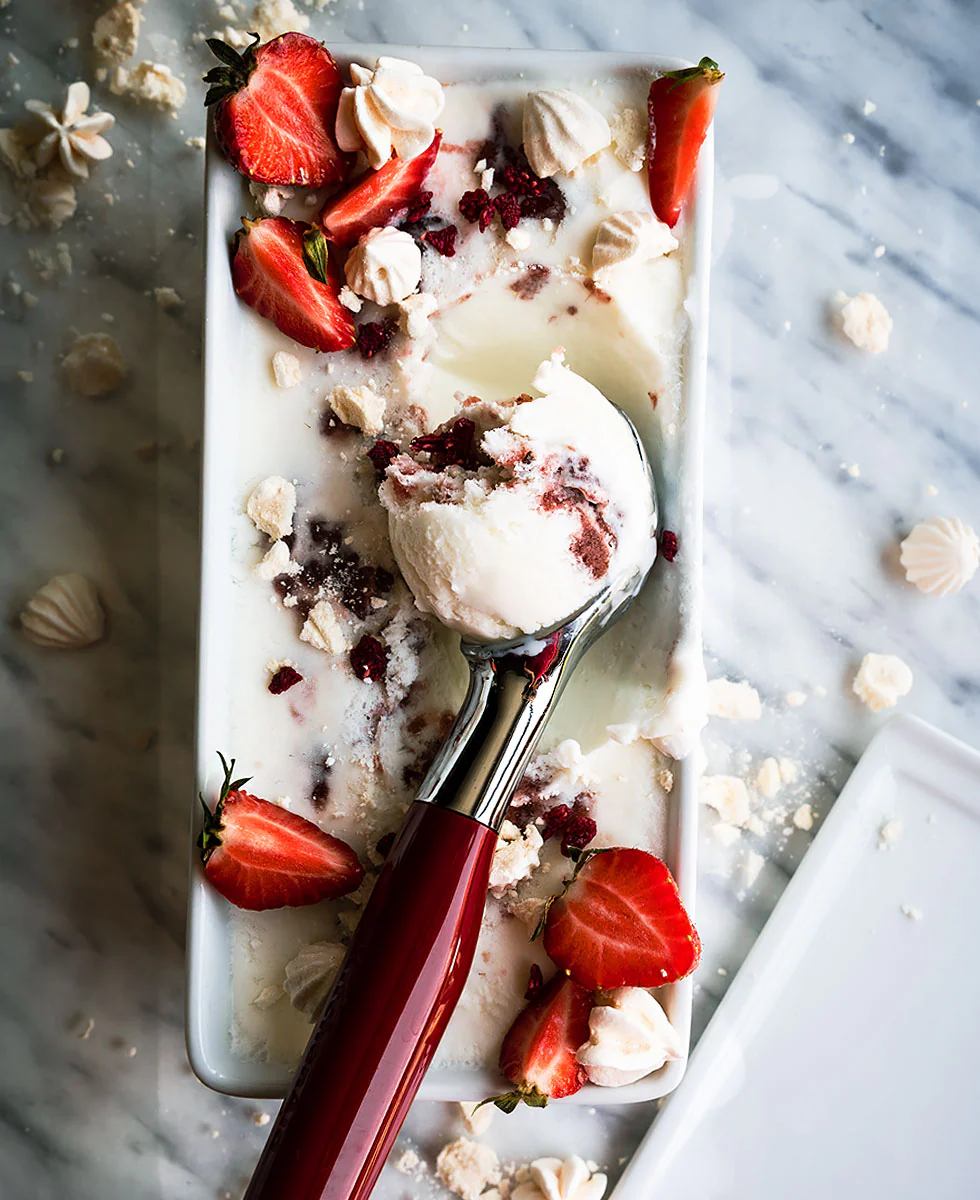
One of the most gratifying things we can make at home during the summer is ice cream. I love them all... Even more so when they’re homemade. Today we’re going to learn how to make a Eton Mess Ice Cream which, I assure you, will really surprise you.
This ice cream is inspired by the classic dessert of English origin, Eton Mess, a preparation that combines, in its traditional format, whipped cream, strawberries and meringue. Sometimes it’s also made with bananas or other types of soft fruit.
To make this ice cream, we will prepare a white cream made mostly with milk, although it also incorporates cream in it, of course. Then we will mix this cream with strawberry jam, aiming to create a zigzag effect, so that when placing a scoop of ice cream we find the white cream with streaks of jam. To present it, we will prepare some meringue cookies with strawberry coulis that we will use as a sandwich.
Do you remember the famous ice cream sandwiches? We'll try to recreate something similar, but with a slightly more eye-catching look.
The result is an ice cream with a texture and consistency closer to a gelato than an ice cream. The difference between the two, among other details, lies in that el gelato it is made with more milk than cream and, on the contrary, ice cream has a higher amount of cream in its mix, it contains more fat. The flavors of gelato they are much more intense, while the ice cream's texture is far creamier.
If I'm honest, the cream or sweet cream ice cream I'm sharing with you reminds me so much of Mini Milk. Do you remember it? It was an ice cream from our childhood, in the 80s-90s, very popular among little kids. Our parents probably bought them for us because they were the perfect size for children (they were quite small) and, for us, it was one of the best ice creams because of its incredible flavor.
When I tried this white cream once churned, it totally took me back to those years. So, if you pour the mix, once churned, into ice pop molds or ice cream molds, you’ll have some incredible homemade Mini Milks ;)
But now we continue with our Eton Mess ice cream.
 Revol rectangular mold and KitchenAid ice cream scoop
Origin of the famous dessert Eton Mess.
There are many stories surrounding the origin of the famous English dessert. As we can imagine, some of them are real and others fictional, but all of them are wonderful because they allow us to travel back to those moments and to the way they might have been created, letting us experience them first-hand. And in many cases, with amusing anecdotes.
Of all the stories and origins related to the origin of Eton Mess, the one about the dog and the pavlova is without a doubt the most widespread.
Legend has it that during the 1920s a cricket match was taking place in the Eton College. A family brought a surprise to the kids at the game so they could enjoy once the game was over, a delicious strawberry pavlova they were carrying in a picnic basket. Before the match ended, a Labrador that was playing around the area, jumped onto the basket and crushed the pavlova. This was not a problem for the kids, nor for the family, since they didn’t mind the small mishap and decided to have it anyway. In fact, they said it was absolutely delicious.
It's a very funny story, though not very believable... And the reason is that Eton Mess had already been mentioned in old documents almost 30 years before this story, around the year 1893.
However, it is believed that the Eton Mess it was first served at a cricket match between Eton and Harrow and, since then, it has continued to be served at this annual match at the famous Lord’s Cricket Ground, or simply Lord’s, a cricket stadium located in the St. John’s Wood district of London.
The word "mess," meaning "disorder/muddle" in English, is believed to refer to its appearance.
Indeed, the name of the dessert can have multiple meanings, although none has been proven to be correct. Some say it refers to its chaotic appearance, while others think it derives from Latin "missum", which refers to "a portion of food".
For our part, we’ll put a twist on the dessert, which is certainly a fantastic option for summer, but we’ll make it more refreshing. In addition, we’ll tweak its presentation a bit to suit the ice cream format better. But of course, we can always serve the ice cream in a cup or glass, and pair it with fresh strawberries and crisp meringues. I’ll leave it up to you!

Ingredients
For the ice cream (1 litro):
- 610 g whole milk
- 165 g whipping cream, 35% fat
- 39 g skim milk powder
- 20 g dextrose
- 140 g sugar
- 20 g inverted sugar (you can see the recipe at: Pumpkin ice cream)
- 6 g neutral stabilizer for creams (can be substituted with egg yolks, see NOTES section)
- 150-200 g strawberry jam
- 240 g egg whites, at room temperature
- 325 g sugar
- Strawberry coulis (recipe below)
- 100 g strawberries, cleaned and hulled
- 30 g sugar
- 10 g lemon juice
To decorate:
- Chopped freeze-dried strawberries (optional)
- Small meringues
- Natural strawberries
Preparation
WE PREPARE THE ICE CREAM MIX
We pasteurize- Prepare two large bowls. Fill one halfway with cold water, preferably from the fridge, and ice. Place another bowl inside it, preferably metal, and set aside while you prepare the mixture so it chills.
- In a large pot, add the milk along with the cream.
- With the mixture cold, without turning on the heat, add the powdered milk along with the dextrose. Mix using a whisk to help the mixture incorporate evenly.
- Blend with an immersion blender to make sure there are no small lumps left.
- Turn the heat on and set it to medium.
- While it comes up to temperature, mix the cream stabilizer with the sugar. Set aside.
- Once the mixture reach 40ºC, incorporate the stabilizer along with the sugar and the invert sugar. Beat after each addition.
- Once all the ingredients are added, stir constantly until reaching 85ºC. It's important to use a digital kitchen thermometer in this process.
- Remove from heat.
- Pour the mix into the bowl we have prepared (with cold water and ice) to cool it down.
- Stir constantly to help the mixture lose temperature and, in that way, help it cool faster. When it reaches the 35º-30ºC, we can pour the mix into an airtight container and refrigerate at 4ºC for 6-12 hours. Ideally, we should let it rest for 12 hours.
We churn
- Take the mixture out of the refrigerator and blend with an immersion blender to make the mixture uniform.
- Use your ice cream maker, whichever you have at home, following its instructions. In my case I did it with the KitchenAid ice cream maker.
- Pour the mix into the ice cream maker and churn for 20-25 minutes.
- For the refrigerator and, next, transfer the mix to a container suitable for storing ice cream like this one from Revol. We spread a layer of ice cream, add a few tablespoons of strawberry jam, and stir to distribute and create "swirls." Fill with the remaining ice cream and repeat the same process with the jam on the surface.
- Cover very well with plastic wrap, put on the lid, and cover the entire container again with plastic wrap.
- Save in the freezer for 12-14 hours.

NOTE: We'll have a little mix left over if we use the Revol container; we can pour it into another container and store it the same way
PREPARE THE STRAWBERRY COULIS
- Wash the strawberries thoroughly, remove the stems, and chop them.
- Add to a saucepan along with the sugar and lemon juice.
- Set to medium-low heat and cook for 20-25 minutes, stirring occasionally. The amount of water should reduce significantly, but not excessively. We should obtain a thick consistency.
- Remove from heat and strain through a sieve.
- Let it cool to room temperature. If you’re not going to use it the same day, store it in an airtight container in the refrigerator until the next day.
We make the meringue cookies
We whip the French meringue
- We add the egg whites in the KitchenAid bowl and we start assembling them.
- Once it starts to foam, we will begin to incorporate the sugar little by little while whisking.
- Continue until you reach a firm consistency. You'll have a very glossy meringue.

WE PREPARE THE COOKIES
- Line a perforated tray with a Teflon sheet or silpat/mat, but not perforated.
- Using an ice cream scoop, place a ball of meringue onto the Teflon. It's not necessary to use the ice cream scoop, but it will make it easier to keep them the same size. You can use a regular spoon instead.
- Spoon a teaspoon of strawberry coulis onto the meringue, then use a toothpick to make a zigzag.
- We repeat the same process with the remaining cookies.
- With the leftover meringue, transfer it into a piping bag and pipe small meringues. Ideally, use different types of tips, if possible. We'll need another baking sheet for this step.
- Put in the oven, previously preheated to 75ºC, and leave the cookies for 4 hours and the meringues for around 2 1/2 hours.
- Ideally, check how the small meringues are after 2 and 1/2 hours; if they need more time, leave them longer. To know if the cookies are ready, they should be completely dry.
- Once ready, take them out and let them rest for a few hours at room temperature. It’s important they’re not in a humid place; it should be cool and dry.

We serve Eton Mess ice cream
- We take out the ice cream and let it sit at room temperature for 4-5 minutes. Meanwhile, we can decorate the surface with pieces of meringue, fresh strawberries, and freeze-dried strawberries.
- We moisten the KitchenAid ice cream scoop by dipping it in a glass of water.
- We make a scoop of ice cream and place it on a meringue cookie.
- Serve with fresh strawberries, meringues (if desired), and a little strawberry coulis. We can present it as a sandwich or as a scoop placed on a cookie and, if desired, another cookie on top.
- We serve immediately.

Notes
- It’s important not to change the ingredients to achieve optimal results in the ice cream, both in flavor and in texture and consistency.
- It is very important that you follow all the steps I outline in the preparation, as well as adhere to the specified temperatures so that the results are good.
- If we don't want to use neutral for creams`, we can use egg yolks instead. In fact, this ingredient is used to stabilize ice cream and to make ice cream without the presence of egg. ` If we use egg yolk instead of neutral, the quantities change completely. They would be as follows: 592 g whole milk, 83 g cream, 45 g skimmed milk powder, 100 g egg yolks, 140 g sugar, 20 g dextrose and 20 g invert sugar.
- If using egg yolks instead of a neutral stabilizer for creams, they must be incorporated at the same moment we add the neutral. One element replaces the other.
- Churning time may vary`, we must obtain a creamy consistency.`
- If it's very hot, I recommend freezing the container where we're going to store the ice cream in order to prevent it from melting and, consequently, spoiling the final texture.
- I don’t recommend adding fresh strawberries to ice cream because they change texture when frozen, the final result is not very pleasant. For that reason we use strawberry jam. we can also add, if we wish, candied strawberries.
- In my case I prefer to add the meringues on the surface, but they can be incorporated into the mix once we’ve churned the ice cream. Keep in mind they will add a lot of sweetness. Ideally, let each person add as much as they want to their ice cream, but you can do it if you like.
- Meringue cookies are optional, but we can't deny that they're a great way to present ice cream.
- In my case, I made them with strawberry coulis, but they can be made with just meringue.
- In my case, I got 8 meringue cookies`, good-sized. If we want, we can make them smaller and get more pieces. In that case, you'll need to adjust the final cooking time. Instead of 4 hours, it will be less time.`
- Another way to make meringue cookies is to pipe them into rosettes instead of placing them with a spoon just as I show you.
- It can be kept frozen for 3 months, aiming to prevent it from melting each time we serve ice cream. This step will cause the ice cream to start forming ice crystals.
You have to try this Eton Mess ice cream... Incredibly refreshing, slightly sweet and with notes of strawberry jam that pairs perfectly with the white cream. Not to mention the meringue with spirals of strawberry coulis that will give us that crunchy touch.
At home we've loved this ice cream variety and the way it's presented, very different from others I've done before. I think it's perfect as a dessert or even to pair with a coffee. Anything to beat this summer heat—in style!
I hope you like it and can't wait to hear how it went!
Sources: The Runnymede on Thames