
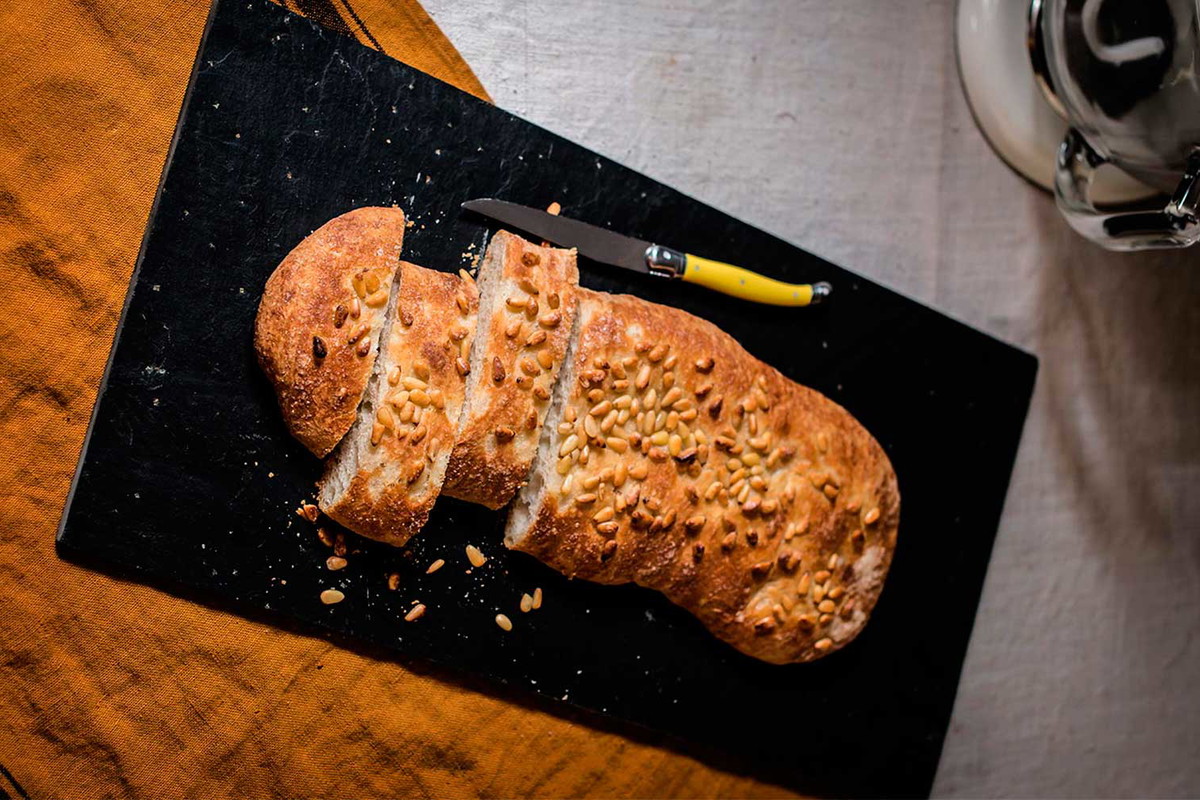
The coca de forner or panadero is a very typical elongated flatbread in Catalonia that was originally made with plain bread dough, brushed with olive oil, topped with pine nuts and sugar on top, and sprinkled with anise as it came out of the oven. Simple and very effective.

These cocas were used when ovens were Moorish or rotating types to settle and warm up the oven, as well as to generate steam for the later baking of the breads. The extremely high temperature left the coca very crisp on the outside and caramelized by the sugar, but soft on the inside because it baked so quickly.

Everything above is explained much better than I could, and from personal experience, which I don't have, Jordi Mercadé here. As he says, no one knows how the custom of drizzling cocas with anise began, but we all agree it's a great invention.

So this is a very simple dough that contains all the wisdom of bread making. Goodness, how sentimental I'm getting; it must be the anise… Let's get to it.

Traditional coca de forner recipe


INGREDIENTS

Pre-ferment:

  • 30 g strong flour
  • 30 g water
  • 1 g dried baker's yeast (3 g fresh yeast)

Coca dough:

  • The pre-ferment above
  • 140 g strong flour
  • 100 g plain supermarket wheat flour
  • 20 g wheat semolina (optional)
  • 1 g dried baker's yeast (3 g fresh yeast)
  • 150 g water
  • 1.3 g salt
  • 20 g extra-virgin olive oil

Finishing:

  • Pine nuts to taste
  • Sugar to taste
  • A good splash of anise

METHOD

PRE-FERMENT

  1. Mix the pre-ferment ingredients in a bowl, without kneading, the night before. Cover and leave overnight at room temperature. If you're making the pre-ferment in summer, you may only need half that amount of yeast.
  2. Also place the pine nuts you plan to use in a bowl of water. This is a tip from Xavier Barriga so they don't burn while the cocas bake.

COCA DOUGH

  1. Put all the ingredients except the pre-ferment, oil, and salt into the bowl of a stand mixer. Mix at low speed, cover, and let rest for 30 minutes for autolysis (this makes the later kneading easier).
  2. After the rest, add the pre-ferment, the oil, and the salt.
  3. Now begin kneading in cycles of 1-2 minutes followed by 10-minute rests, until you get a smooth, elastic dough, which will be fairly sticky; that's normal.
  4. Form the dough into a ball and place it in an oiled container. Cover and let it double in size.
  5. Turn the fermented dough out onto a generously floured work surface, fold it lengthwise into thirds, like a letter, flatten very lightly with your fingers, and transfer the dough to a sheet of baking paper.
  6. Stretch it a little by slipping your fingers underneath until you form a coca about a finger thick.
  7. Cover and let it rise again. Meanwhile, preheat the oven to at least 240°, even higher if your oven can reach it.
  8. When the coca has risen, brush it generously with olive oil. Sprinkle on the pine nuts first and then the sugar.
  9. Transfer the paper to a baking tray (perforated ones are ideal for a quick and effective bake) and bake the coca for 15 minutes without fan. Then lower the temperature to 200° and bake for another 5 minutes to finish browning and drying the coca, preferably with convection fan on.
  10. Fill a kitchen squeeze bottle with the anise and generously drizzle the coca as soon as it comes out of the oven. Let it cool on a wire rack; it will be ready to eat right away because, being so thin, it cools very quickly.


    So there you have the recipe for coca de forner, so satisfying that you'll make it again and again. Word of an amateur forner.

     

    Recipe author: Miriam from El Invitado de Invierno

    Comments

    Claudia said:

    Hola Gema, no hace falta que pongas nada, a falta de la sémola de trigo. Un saludo!!

    Claudia said:

    Verdad que sí, Gloria? Por algo es un clásico, un saludo!

    Gema said:

    Me encanta esta coca! Una pregunta: si no tenemos sémola de trigo duro, ponemos la cantidad equivalente de harina normal o no ponemos nada?

    Gloria Vázquez said:

    Tan sencilla y tan rica, una de mis preferidas. Gracias

    Leave a comment

    Traditional Baker's Coca

    Claudia Ferrer

    Comensales

    8

    Tiempo de preparación

    30 minutes

    Tiempo de cocinado

    20 minutes

    Cuisine

    Catalan

    Categoria

    Baking

    Baker's coca, or coca de forner, is a flat, elongated bread that is very typical in Catalonia. Originally, it was made with unenriched bread dough, brushed with olive oil, topped with pine nuts and sugar, and sprinkled with anise when it came out of the oven. Simple and very effective.

    These cocas were used when ovens were Moorish-style or rotating, to settle and temper the oven, as well as to generate steam for the later baking of bread. The very high temperature left the coca very crisp on the outside and caramelized from the sugar, yet tender on the inside thanks to the quick baking time.


    All of the above is explained much better than I could, and from personal experience, which I do not have, by Jordi Mercadé here. As he says, nobody knows how the custom of drizzling cocas with anise began, but we all agree that it is a brilliant invention.


    So this is an extremely simple dough that contains all the wisdom of breadmaking. Good heavens, how cheesy I get; it must be the anise… Let’s get to it.

    Traditional Baker's Coca

    Ingredientes

      blank

      • 30 g bread flour

      • 30 g water

      • 1 g dry baker's yeast (3 g fresh yeast)

      blank

      • The starter above

      • 140 g bread flour

      • 100 g regular supermarket wheat flour

      • 20 g semolina (optional)

      • 1 g dry baker's yeast (3 g fresh yeast)

      • 150 g water

      • 1.3 g salt

      • 20 g extra virgin olive oil

      blank

      • Pine nuts to taste

      • Sugar to taste

      • A good splash of anise

      Preparación

        blank

        1. Mix the starter ingredients in a bowl, without kneading, the night before. Cover and leave overnight at room temperature. If you make the starter in summer, half that amount of yeast will probably be enough.
        2. Likewise, put the pine nuts you are going to use in a bowl of water. This is a tip from Xavier Barriga so they do not burn when the cocas bake.

        blank

        1. Put all the ingredients except the starter, the oil, and the salt into the bowl of a stand mixer. Mix on low speed, cover, and let rest for 30 minutes for autolyse (this makes the later kneading easier).
        2. After the resting time, add the starter, the oil, and the salt.

        3. Now start kneading in cycles of 1-2 minutes followed by 10-minute rests, until you get a smooth, elastic dough, which will be quite sticky; that is normal.

        4. Shape the dough into a ball and place it in a greased container. Cover and let it double in volume.

        5. Turn the risen dough out onto a generously floured worktop, fold it lengthwise into three parts like a letter, flatten it very lightly with your fingers, and transfer the dough to a sheet of baking paper.

        6. Stretch it a little by slipping your fingers underneath until you form a coca about a finger thick.

        7. Cover and let it rise again. Meanwhile, preheat the oven to at least 240°, even higher if your oven can reach it.

        8. Once the coca has risen, brush it generously with olive oil. Sprinkle the pine nuts first, then the sugar.
        9. Transfer the paper to a baking tray (perforated ones are ideal for quick and effective baking of the dough) and bake the coca for 15 minutes without fan. Then lower the temperature to 200° and bake for another 5 minutes to finish browning and drying the coca, preferably with convection fan.
        10. Fill a kitchen squeeze bottle with the anise and generously spray the coca as soon as it comes out of the oven. Let it cool on a wire rack; it will soon be ready to eat because being so thin, it cools down very quickly.