
Making your own homemade butter is as easy as having fresh heavy cream and 10 or 12 minutes. Nothing more. No additives or preservatives. You’re probably curious to see how you can do it, because enjoying the delicious butter you’ve made in the morning makes the day start twice as happy!
Eva, author of Bake-Street, tells us how to prepare a delicious homemade butter, and also some tips if you want to flavor it.

Olive wood board with Bérard knife
Making artisanal preparations at home is undoubtedly very rewarding, but even more so when ingredients we consume daily, like butter, are within our reach in just a few minutes.
Evolution and progress are good; they allow us to reduce the time we spend on daily tasks and make our path much easier. But it is also true that when we create with our hands, following an artisanal process, the feeling that surrounds the result is much more endearing and I might even say romantic.
It’s a moment when we transform food to create with natural ingredients that will accompany us in our daily life. Knowing exactly what it’s made of and understanding the entire process from start to finish.
That’s why the moment I saw this L. Tellier butter churn I fell in love instantly. I felt transported to my childhood remembering everything our grandmother did for her grandchildren, dedicating her time, effort and affection… they were undoubtedly the best snacks of my life.
Handling this butter churn is very simple; with a few turns of the crank we’ll enjoy homemade butter in minutes. Its inner paddle speeds up the process much more than if we used whisks.
The final texture will be different from what we usually buy in stores; the main difference is that commercial butter has 80% fat with 15% water (not counting all the additives to improve flavor, coloring…), and the butter we make at home will have 65% fat versus 30% water, it will be more watery, as well as firmer than commercial butter.
The final result will be smoother, its aroma will remind us of fresh cream and it will be very healthy for us. Not to mention that it came from our hands. Now, let’s see how to make this homemade butter and learn to flavor it for certain preparations.
INGREDIENTS TO OBTAIN 125 G OF BUTTER
• 400 ml of fresh cream or cream with a fat content between 35-38% cold
PREPARATION
Pour the cold cream into the glass container of the butter churn, place the lid with the crank making sure to close it well.
Start turning the crank, holding the top to prevent it from sliding on the work surface. As we turn we’ll see the cream begin to whip; the higher its fat content the sooner it will whip and the more of it we’ll obtain.

Once the cream is completely whipped continue turning the crank; our goal is to overbeat it to separate the fat from the whey. This step will sound familiar if your cream has ever broken at home while whipping.
Through the glass we can observe how its texture changes, although if you prefer you can open the churn to watch how its texture evolves.
As we continue beating the cream, once it’s whipped, there will come a point when the fat globules, protected by membranes of fatty acids and proteins, will break and allow the fats to come together.
At this step we’ll get an appearance of a broken texture. On one side we’ll have the solids and on the other the butter whey or buttermilk.
We’ll know we’ve reached the right texture because it will be very hard to turn the crank. The manual beating time will take around 10-12 minutes.
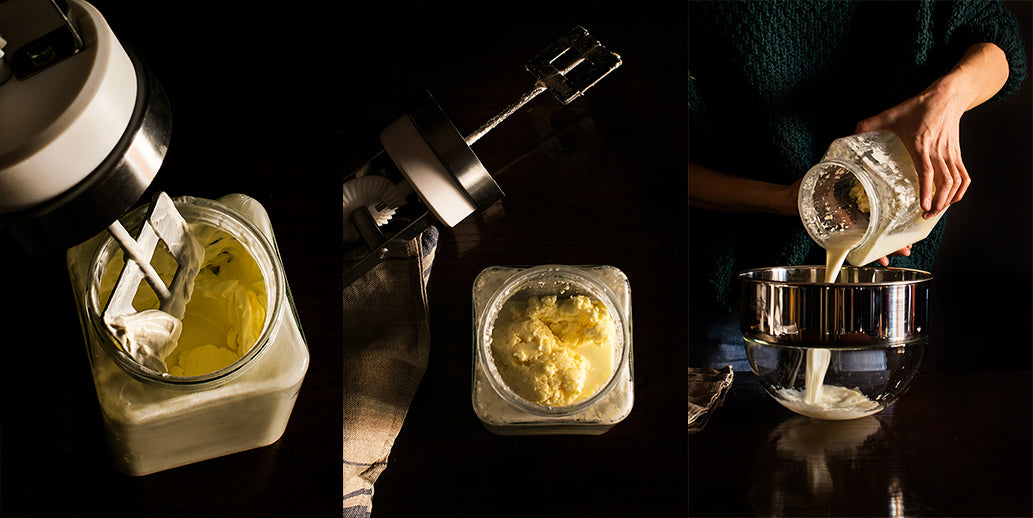
We proceed to strain the whey to keep the solids. Place a fine sieve over a bowl, pour both ingredients over it, helping ourselves with a spatula, and let the whey drain well.
To remove as much whey as possible from the butter, press with your hands over the sieve. Remove the butter from it and bring the solids together, forming a ball between your hands.
Note: If you want to make salted butter, this is the time to add the salt, preferably flaky sea salt, such as Flor de sal de Guérande.
The amount would be 1 g of salt for every 50 g of butter.
Wash the butter in cold water, dry with absorbent paper and place in a butter mold or you can shape it.
If we choose the latter option, place the butter on a sheet of cling film, roll it like a candy and spin it on the table to give it a rounded shape. We can do it by hand if desired, but this way the surface will be more uniform.

Store in the refrigerator for at least 1 hour. Remove and you can serve, on a board like this olive wood one from Bérard, accompanying delicious breads, grissini…
Would you like to be able to flavor your butters?
The process to follow is very simple. Once we have beaten the butter and separated the solids from the whey, it’s time to add the ingredients with which we want to flavor it.
I’ll leave you a couple of ideas to accompany appetizers, toasts, enrich doughs or even to cook fish or meats with it.
Lemon and cilantro butter:
• 125gr of homemade butter
• zest of one lemon
• 8gr of fresh cilantro finely chopped
• 2gr of flake salt
• pinch of pink peppercorns
Orange and cinnamon butter:
• 125 g of homemade butter
• zest of one orange
• ½ teaspoon of ground cinnamon
The preparation process is the same as we followed before. Once we have the solids separated, have washed and dried the butter, proceed to incorporate the remaining ingredients that will flavor our butter.
Store in a container or shape in cling film and refrigerate.
Its shelf life is shorter than commercial butters. You can keep it in the fridge for a week.


Comments
Lisbeth said:
Hola, cómo se puede utilizar el suero de leche en una receta de bizcocho de vainilla.
Gracias
Xara said:
Si de 400 grs de nata sale 125 de mantequilla, los 275 demás es buttermilk?
Claudia said:
Hola Aurely, cabeza la mía se me pasó por completo el comentario!! ¿Podrás disculparme? La máquina para mantequilla la puedes encontrar en nuestra tienda, te dejo el enlace: https://www.claudiaandjulia.com/products/maquina-para-mantequilla-casera . Cualquier duda puedes escribirnos también a tienda@claudiaandjulia.com Espero me perdones!! Saludos, y a disfrutar!
Aurely said:
Hola , si me gustaría saber donde se puede conseguir la maquina de hacer mantequilla y mas o menos que precio puede costar. Gracias
Carolina said:
Muchas gracias Eva :)
Eva {Bake-Street} said:
¡Buenos días Carolina!
De verdad que es fantástico saber que hemos podido ayudarte a rememorar aquellos maravillosos momentos. Eso mismo sentí yo cuando vi la mantequera, pero mucho más cuando me dispuse a hacerla en casa. Era como si estuviera en casa de mi abuela compartiendo con ella aquellos maravillosos momentos en los que nos preparaba las mejores meriendas del mundo con sus manos :)
Respecto a tu duda del buttermilk, por supuesto! Olvidé hacer una pequeña nota especificando que podemos guardar el buttermilk en un recipiente de cristal y refrigerarlo, no dejaría más de 5-6 días en frío (no lo congeles), para poder utilizarlo en elaboraciones como pudiera ser el clásico red velvet ;)
Una manera que tenemos de hacerlo es como especificas, unas gotas de limón en un poco de leche. Pero verás como este suero procedente de la desunión de los sólidos al elaborar la mantequilla, es mucho mejor ;)
Gracias a ti!!
Carolina said:
Mi madre solía hacer la mantequilla de vez en cuando, tenía un sabor especial :)
Me habéis traído lindos recuerdos a la memoria.
Tengo una pregunta: hay preparaciones de repostería que llevan preferentemente buttermilk, yo suelo utilizar leche con un poco de limón; ¿se podría guardar el buttermilk de la preparación de la mantequilla y utilizarlo?¿duraría también una semana aproximadamente en nevera?
Gracias!!!
Eva {Bake-Street} said:
¡Buenos días Mariona!
Sí, también puede hacerse con unas varillas eléctricas sin problemas. La velocidad te recomiendo que sea gradual, principalmente para que no salga todo el líquido desperdigado por la encimera :)
Comienza por la velocidad más baja y aumenta de manera gradual, a medida que vaya montando la nata, sin llegar a la velocidad más elevada.
Todos los ingredientes que queramos añadir para aromatizar la mantequilla debe hacerse cuando ya se han separado los sólidos de los líquidos, y hemos colado, lavado y secado la mantequilla obtenida.
Ahí los añadimos y procuramos amasar un poco para distribuirlos de manera homogénea.
¡Gracias a ti! esperamos que te animes pronto con ella ;)
Eva {Bake-Street} said:
¡Hola Marta!
Sí, también puedes hacerla en la Kitchen Aid. Lo único que debes tener en cuenta es que la cantidad de nata sea la suficiente para que las varillas puedan montarla :)
¡Gracias a ti!
Eva {Bake-Street} said:
¡Hola Esperanza!
Muchas gracias, nos alegra saber que te han gustado tanto. Ahora solo queda animarse con ellas! ;)
Gracias a ti, ¡ya nos contarás!
Eva {Bake-Street} said:
¡Buenos días Mario!
Muchas gracias, me alegra mucho que te haya gustado. Sin duda es una elaboración muy sencilla y gratificante, en cuanto puedas anímate con ella :)
Mariona said:
Si no tienes la maquina se puede montar la nata con uns varillas electricas? A qué velocitad? Si pic amos hierbas aromàticas, cuando las podrías? Al final en el última montada? Gràcies!! ?
marta said:
Hola!
M’agradaria saber si es pot fer mantega amb la Kitchen Aid.
Moltes gràcies!!!
Esperanza said:
Me ha gustado mucho como la habéis hecho y la habéis explicado. Y esas recetitas… ¡Que originales! Muchas gracias.
Mario A Lorenzo Ruano said:
Muy sencilla y muy interesante para experimentar en un dia.