
I have to admit that, when it comes to sweets, I have a weakness — and brioches drive me crazy! So I couldn't resist sharing with you the recipe for this delicious orange brioche. Today I've shaped it as a bundt cake.
I promise it's a foolproof combination: the softness of the dough, incredibly fluffy, the delicate buttery flavor, and of course, the delicious touch that the orange adds — it's enough to go crazy!!
If you've never made yeasted doughs, it may seem complicated, but nothing could be further from the truth; it just requires patience. Although I must admit that I always use my Kitchen Aid to make this type of dough, as it makes the job much easier. It's also a real delight to watch the dough acquire that silky texture as the butter is incorporated. I get hypnotized watching the brioche being kneaded in the Kitchen Aid — it's better than many TV shows, I promise!!
On this occasion I added pieces of candied orange to the dough, which I also used to decorate the brioche, but this is completely optional; if you don't like them, you can leave them out, since the orange flavor in the brioche comes from the juice and zest added to the dough.
As you can see, I used a Nordic Ware mold to bake the brioche, which is something I do often because the baking is very even, and the brioche couldn't be prettier!! And it's clear these molds aren't just for making delicious cakes.
Let's get the recipe!!
 Kugelhopf Bundt Nordic Ware mold and Caractère Revol porcelain plate
Ingredients
For the brioche dough:
- 500 g strong flour
- 10 g salt
- 100 g sugar
- 150 g egg
- 130 ml orange juice
- 40 g fresh yeast or 12 g dry baker's yeast
- Zest of 1 orange
- 100 g butter
For the candied oranges (optional):
- 2 medium oranges
- Water for boiling (about 500 ml)
- 1 teaspoon salt
- 200 g sugar
- 100 ml water

KitchenAid stand mixer Grenadine Red and Microplane grater
Preparation
For the candied oranges:
- Wash the oranges well, and with a sharp knife, cut them into slices about 1 cm thick.
- Place the orange slices in a saucepan with the boiling water and the teaspoon of salt and set over medium-high heat.
- Once the water reaches a boil, lower the heat to the minimum and let simmer for about 5 minutes.
- Remove the pan from the heat and place the orange slices in a colander (discarding the cooking water).
- Rinse the oranges under cold running water, taking care that the stream isn't too strong so as not to damage the orange flesh. This step removes the bitterness from the orange peel.
- Next, return the orange slices to the pan, add the 200 g of sugar and the 100 ml of water and simmer gently for about 30 minutes, trying not to touch the oranges so they don't break.
- After that time, remove the pan from the heat and let the oranges cool in the syrup.
- Before adding them to the brioche, drain them well, placing them on a rack to remove excess syrup.
- To add them to the brioche cut them into small dice (reserving 6 slices for decoration)
For the brioche:
- In the bowl of the Kitchen Aid put all the ingredients except the butter. If you use fresh yeast crumble it before adding.
- Attach the dough hook to the Kitchen Aid and knead at speed 1 for about 10 minutes, until you obtain a smooth dough.
- At that point begin adding the butter little by little, not adding a piece until the previous one is perfectly incorporated.
- Knead until you obtain a smooth, elastic dough that pulls away from the sides of the bowl (about 15 minutes approximately).
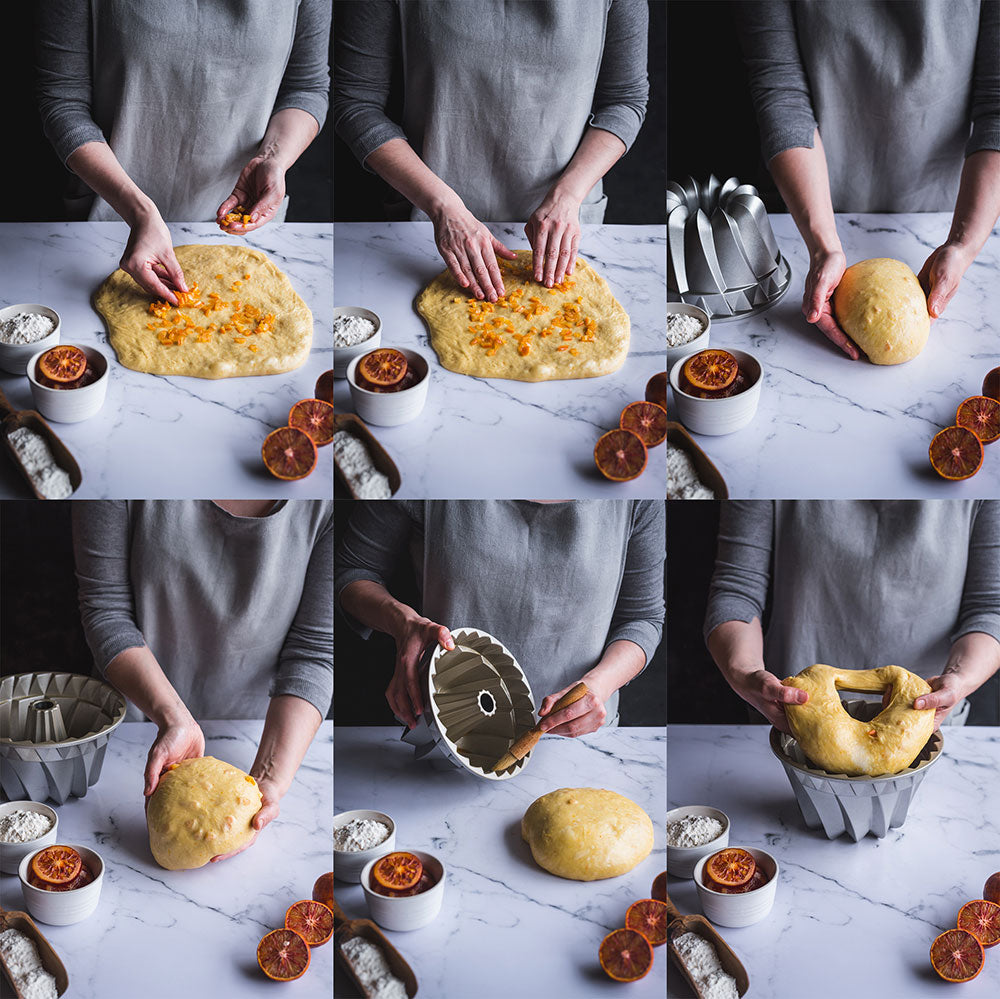
- Turn the dough out onto the work surface, stretch it into a rectangle and distribute the candied orange pieces over it.
- Cut the rectangle of dough in two and place one on top of the other so the orange pieces are evenly distributed in the dough.
- Next, shape the dough into a ball, put it in the Kitchen Aid bowl lightly greased, cover it with plastic wrap and let it rise in a warm, draft-free place until it doubles in volume (around an hour and a half to two hours, depending on room temperature).
- When the dough has doubled in volume, turn it out onto the work surface and, pressing gently with your fingertips, degas it and let it rest for 10 minutes to relax, covered with a kitchen towel.
- Then shape the dough into a ball and make a hole in the center with your fingers, making the hole large enough to fit through the chimney of the Bundt mold.
- With a non-stick baking spray grease the Bundt pan and set aside.
- If you decide to use the candied oranges for decoration, cut the reserved orange slices in half and place them in the base of the Bundt pan.
- Next, place the brioche dough in the mold, cover the dough with plastic wrap and let it rest until the dough doubles in volume.
- Meanwhile, preheat the oven to 180°.
- Once the dough has doubled in volume, bake at 180° for 40 minutes.
- After that time remove the brioche from the oven and let it cool on a wire rack for 10 minutes.
- Unmold and let it cool completely on the rack before enjoying.
Kugelhopf Bundt Nordic Ware mold
Notes:
-
Like all pastries of this type, it's best to eat the brioche the same day, but if kept in a resealable bag it will keep quite well for one more day.
-
In any case, it freezes wonderfully, so if we're not going to eat it all the same day, it's best to freeze it and when we're ready to eat it, let it thaw at room temperature.
How about adding pieces of dark chocolate to the dough? The flavor combination is fabulous. Or try incorporating some nuts, or raisins… The possibilities are endless, and with a brioche base as delicious as this, any combination will be fantastic.

Kugelhopf Bundt Nordic Ware mold


Comments
Antonia said:
Feliz!! con el resultado de este briox una receta expectacular lo recomiendo, gracias
Salvador said:
Mil gracias por la información. Tienes toda la razón en que los brioches son bastante puñeteros, sí. Probaré a usar otra harina pero la que usé es de una fuerza superior a W360 así que debería estar bien, pero bueno, vete tú a saber si lo que pone el paquete es correcto. En cuanto a lo de la amasadora, lo tendré en cuenta para la próxima vez, sobre todo el tiempo de reposo. Quería consultarte también si me lo permites, el tema del horno, para los horneados. Tengo un Balay un poco antiguo que va muy bien para lo básico, pero viendo lo complicado que es esto de la repostería, me he aventurado a sustituirlo por otro, un Neff 100% vapor, pero aún no me ha llegado. Ha sido caro pero según he investigado parecen ser buenos, aunque no sé si ha valido la pena el desembolso extra por ser de vapor 100% ¿Tienes experiencia con esta marca o la conoces al menos?¿Qué opinión te merece? Muchas gracias de nuevo por todo, por el blog y por tus consejos, tan útiles para los que estamos empezando.
Leticia Revelando Sabores said:
Hola Patricia, le acabo de contestar a Salvador, échale un vistazo a ver si te puede ayudar.
En cuanto a que no haya crecido la masa, puede deberse a una temperatura muy baja en el lugar donde está llevando la masa.
O quizá algún problema con la levadura. Si era fresca y llevaba unos días en casa, puede perder algo de eficacia.
Espero haberte ayudado en algo.
Un abrazo,
Leticia
Leticia Revelando Sabores said:
Disculpame Salvador que se me cortó el mensaje…
Decía que, a pesar de que la harina utilizada fuese harina de fuerza, quizá no tenía la fuerza necesaria (cuánta más fuerza tenga la harina, más líquido absorberá).
Por otra parte, la Kitchen Aid mini tiene algo menos de potencia que la Artisan, por lo que puede ser necesario alargar el amasado, o mejor aún, dejar reposar 10 minutos la masa y continuar con el amasado. Verás como ese reposo mejora la textura de la masa.
Espero que esto te ayude.
Un abrazo
Leticia
Leticia Revelando Sabores said:
Hola Salvador!!
En primer lugar ya siento que no haya salido bien el brioche!
Los motivos por los que puede no haber salido bien pueden ser varios (el brioche es un poquito puñetero a veces…)
En primer lugar puede ser por la harina, que a pesar de que hayas utilizado harina de fuerza, no tuviese la fuerza necesaria
Patricia said:
Hola! Me encanta vuestra página. Yo también he intentado hacer la receta al pie de la letra, pero me ha sucedido lo mismo que a Salvador. Masa pegajosa y, para la cantidad de levadura que lleva, no ha crecido nada la masa :(…no sé a qué se deberá, alguna idea?
Salvador Casares said:
Es una receta espectacular, pero aunque he la he seguido al pie de la letra, he utilizado las cantidades exactas, pesadas al gramo, y los líquidos, exactos también al mililitro, y los tiempos de amasado, cocción y demás, no he conseguido que se despegue completamente del bol de la KitchenAid. Es cierto que no tengo una Artisan, sino una mini por problemas de espacio, pero no creo que ese sea el problema, ¿o sí?… El resultado es que la masa era más pegajosa de lo que debería y claro, la “bola” no ha sido como la de otros brioches que he hecho y que han salido bien. No lo he tirado (ganas me han dado), pero el resultado ha sido penoso.
¿Alguna idea por favor de qué puedo haber hecho mal?
Muchas gracias.
Leticia Revelando Sabores said:
Hola, Una casa con vistas, claro!! Puedes hacerlo en el molde que prefieras!! Incluso en uno tipo plum cake😊
Una casa con vistas said:
Pues tiene que estar bueno. ¿Se puede hacer en cualquier molde?
Leticia Revelando Sabores said:
Hola Almudena!! Disculpa que es cierto que no he puesto ese detalle. La mantequilla blanda, para que se integre mejor en la masa ☺️. Espero que te guste!!
Almudena said:
Una duda. La mantequilla fría, blanda o en pomada? La voy a hacer! Me fascina el broche y además tengo ese Nordic !
Leticia Revelando Sabores said:
Hola Judith!! Muchas gracias a ti ☺️. Sí, es correcta la cantidad de levadura fresca, 40 g.
De todos modos puedes rebajarla si lo prefieres, y aumentar los tiempos de levado, que serán más largos.
Mª TERESA said:
La probaré,gracias
Judith said:
Muchas gracias por esta receta. Es correcto 40g de levadura fresca, verdad?
Nieves said:
Me parece una receta buenísima, voy a probar a hacerla.
Gracias