
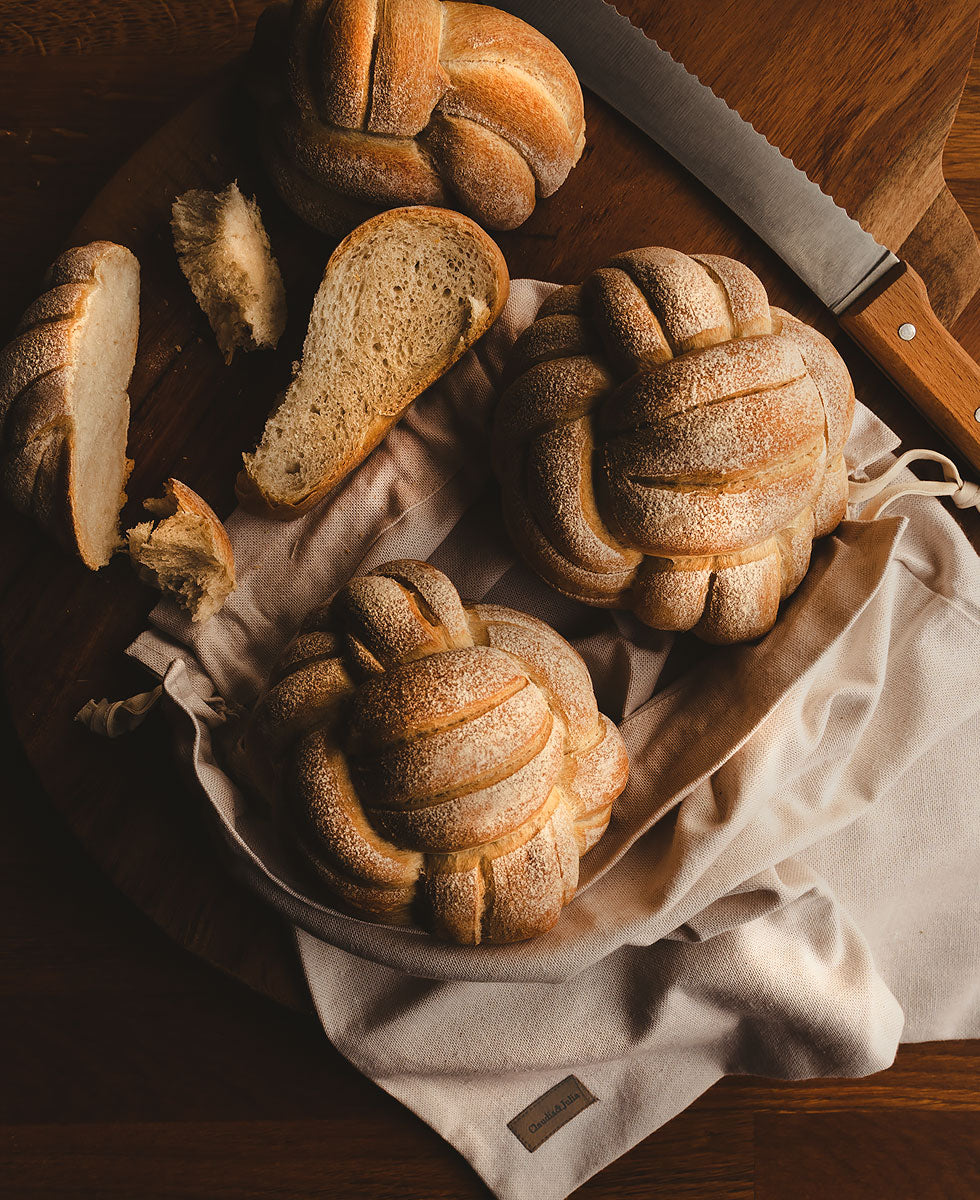
Making bread is always one of the best options we can choose when we want to disconnect and relax a bit. But, if we also want to enhance our most creative side, we can carry out a different shape like this Bread Ball .
I remember the first time I saw him, it was in a course I did with Josep Pascual. I have very good memories of that weekend, and I was also lucky to meet wonderful people with whom I still maintain a relationship to this day. The bread unites a lot.
Surely many of you know Josep Pascual, I remember that he became known for his creative breads. He always made shapes that were different from what we used to see on the internet (at that time there wasn't as much information as there is now) and he decorated the loaves with somewhat particular stencils . The result of his elaborations was very striking.
Among all the preparations that we learned to make with him, in a bakery in Talaván (Cáceres), one of them was this bread. To be honest, the first time I did it, it didn't work out very well... Forming the dough cords and braiding/forming the bread afterwards, was a somewhat complicated task at that time. But, I really enjoyed the experience and the company.
The recipe that I have carried out is not that of Josep Pascual, it is a bread dough that works very well for this type of formation and with which you will obtain a wonderful bread for sandwiches, slicing or for whatever you prefer.
In addition, I detail the entire process step by step so that you could carry it out at home with very good results. And so that you do not get lost during the process, I am linking a video where you can see how to carry it out in a more visual way so that there is no room for error.
Ingredients (for 3 loaves of 265 g/piece)
- 500 g flour T45 or strength flour W=280, approximately
- 290-300g water
- 18g olive oil
- 6 g fresh yeast or 2 g dry yeast
- 9g salt
Preparation
Prepare the dough for the ball bread:
- In the KitchenAid bowl, add the flour along with the water and yeast.
- Knead at medium speed until you get a homogeneous mass.
- Add the salt and knead again until smooth.
- Once you have a medium gluten developed, add the oil. The ideal is to do it in two parts, wait for the dough to absorb the first one before integrating the next one. This step facilitates the process of kneading/integrating the fatty ingredients.
- The complete kneading process can take around 20-30 minutes to develop the gluten well and obtain an elastic, soft and well-developed dough. The dough, always after resting, must pass the membrane test. To do this, take a portion of the dough and slide it between your fingertips. If you can achieve a thin dough veil, without it cracking or, if it does, being a perfect circle, then you have your dough ready.
- NOTE: If you rest during the kneading process, the dough should always be covered to prevent it from drying out.
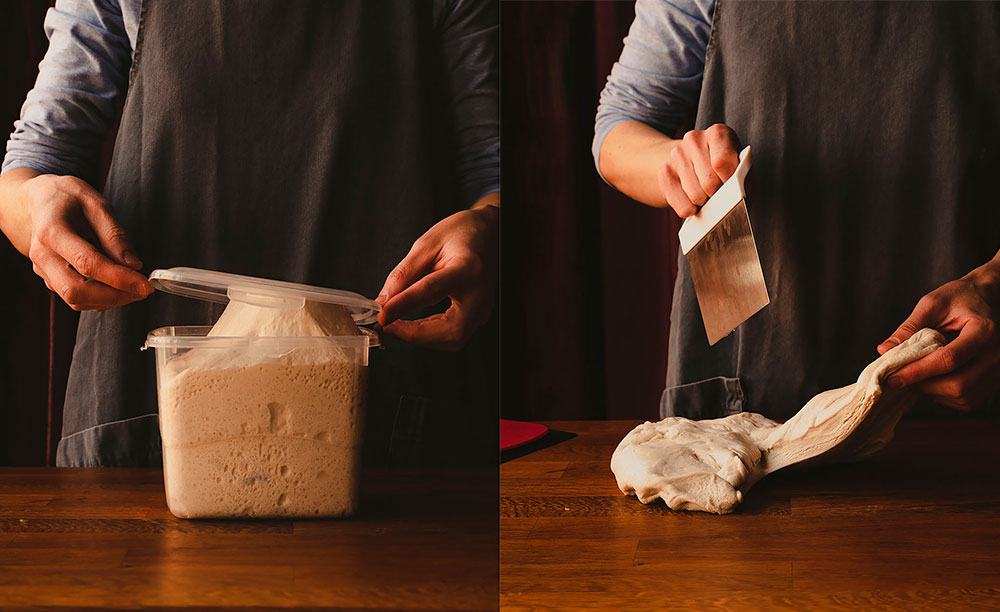
Do the first fermentation/block fermentation:
- Roll the dough, grease a bowl/tupperware lightly with oil and introduce the dough inside.
- We cover with film or its own lid and let rise until it grows ⅓ of its volume. In my case it was 2 hours at 22.5ºC .
- Put in the fridge until the next day.
Temper the dough before working:
- Remove the dough from the refrigerator and temper for 1 hour . The dough will have grown more than 4 times its size.
- With the help of a scraper , divide the dough into 3 pieces of approximately 265 g .
- Each piece is divided into 6 parts of 44 g each . You need 6 strings of dough to form each ball of bread.
- Do not worry if there are scraps of dough, place them in each corresponding piece trying to give it a rectangular shape.
- Cover with film and let rest for 5 minutes .
Shape dough ropes:
- With the help of a roller, stretch each piece slightly trying to give it a rectangular shape.
- Roll the dough around the widest part to form a cord.
- Place your hands on the piece and slide, at the same time, exerting a little pressure to lengthen the string of dough.
- Repeat the same process with the rest of the pieces.
- Cover the dough with film whenever you have handled it to prevent it from drying out and making it difficult to work with.
- Let rest for 10-12 minutes to help the gluten relax and allow us to stretch the dough well.
- After the rest time, stretch each cord again in the same way as the previous time. Place both hands on the dough and slide, rolling the piece and taking each of the hands towards one end, to give length. We need each string of dough to measure about 40-42 cm .
- If you notice that the dough is still tense or that it tends to shrink back to its initial shape, let it rest a bit longer to allow the gluten to fully relax.
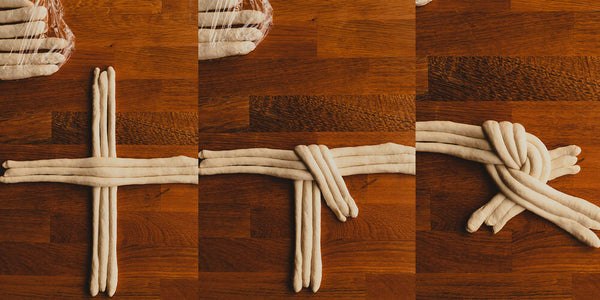
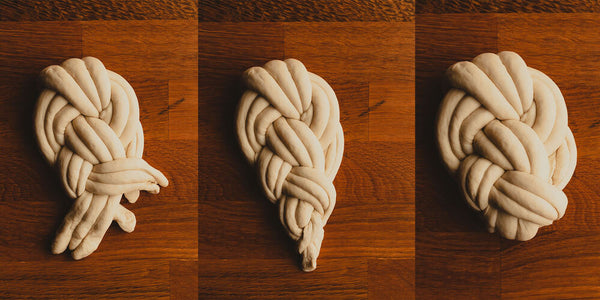
Shape the bread ball:
- To form each ball of bread, you need 6 strings of dough 40-42 cm long .
- Lay 3 strands, side by side, of dough upright.
- On these, place another 3 strings of dough in a horizontal position forming a cross.
- Take the part formed by three cords from the top of the cross and lower them down, placing them on the right side of the cross.
- Fold the right part of the cross over the dough part that we just lowered.
- Overlap the bottom of the cross, bringing it to the right side, over the last part we've lowered. The purpose is to braid the dough.
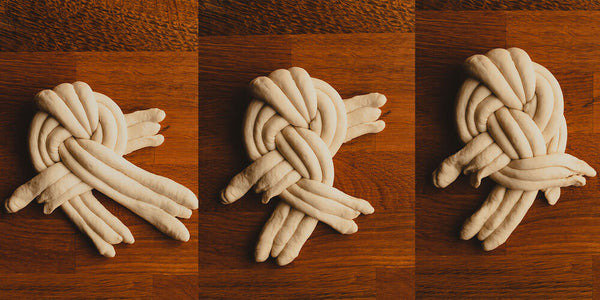

15. Cover with film and let rise until they grow a little more than double their volume. In my case they were 2 hours at 22.5ºC .
16. NOTE: In this video you can see Josep Pascual how he forms this bread.
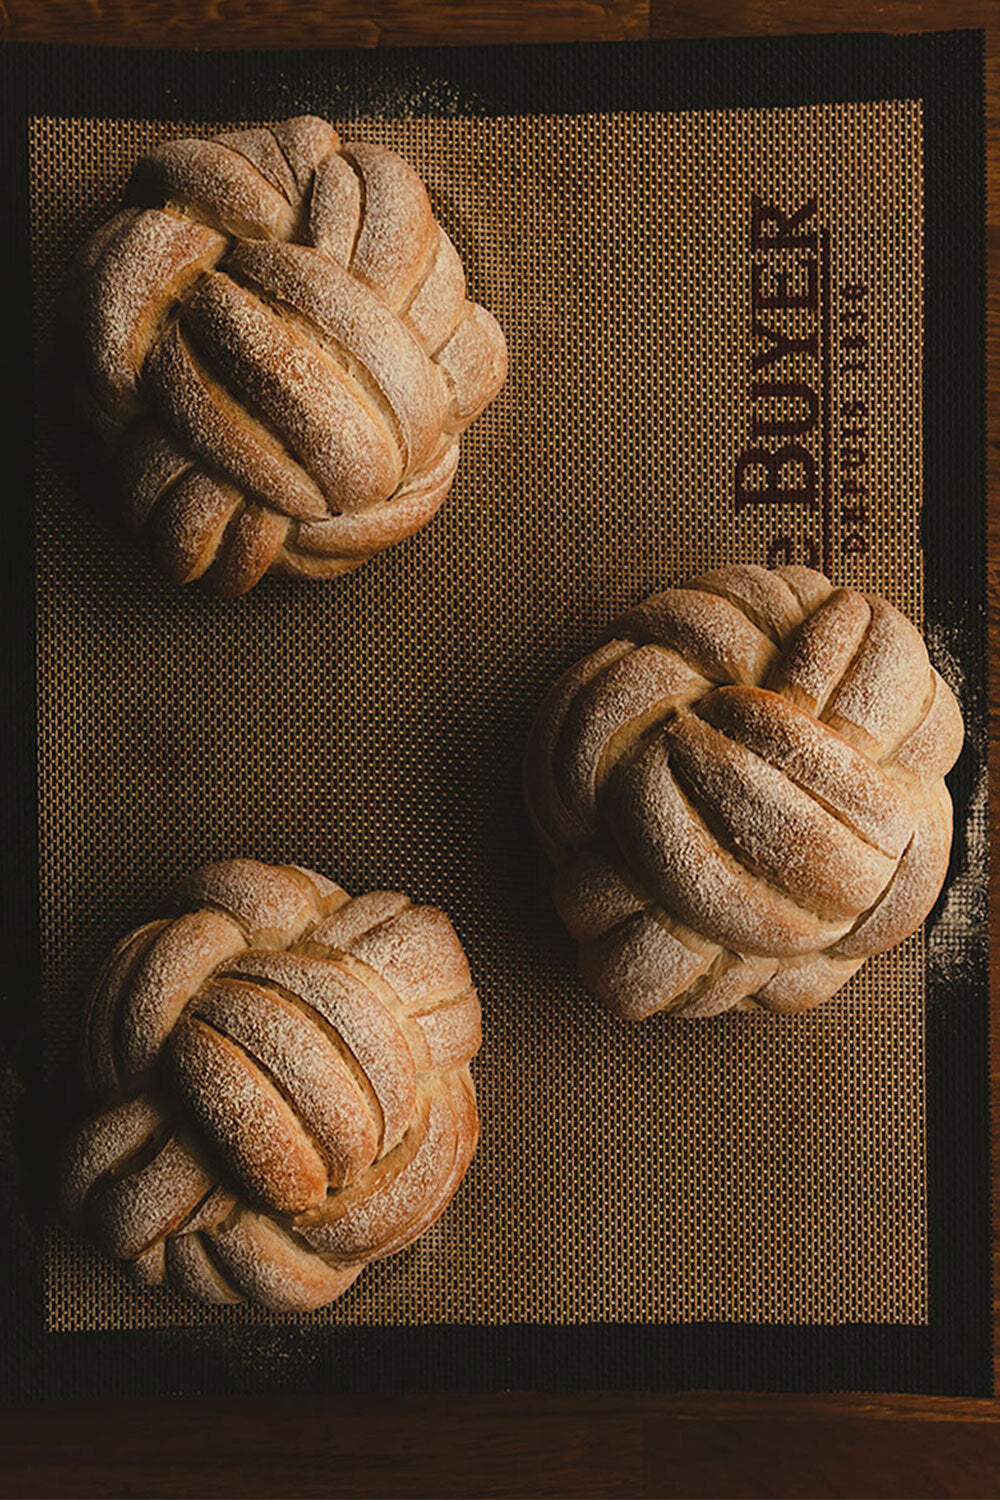
Baking - Option 1) Bake the ball bread in a baking tray:
- Preheat the oven to 210ºC with heat up and down.
- Sprinkle the bread with a little flour on the surface.
- Introduce at medium height and bake with steam for 10 minutes.
- Remove the steam, reduce to 190ºC and bake for another 20 minutes.
- Finally, bake for 5 minutes with air at 190ºC.
- Remove from the oven and let cool completely on a wire rack.
- We serve.
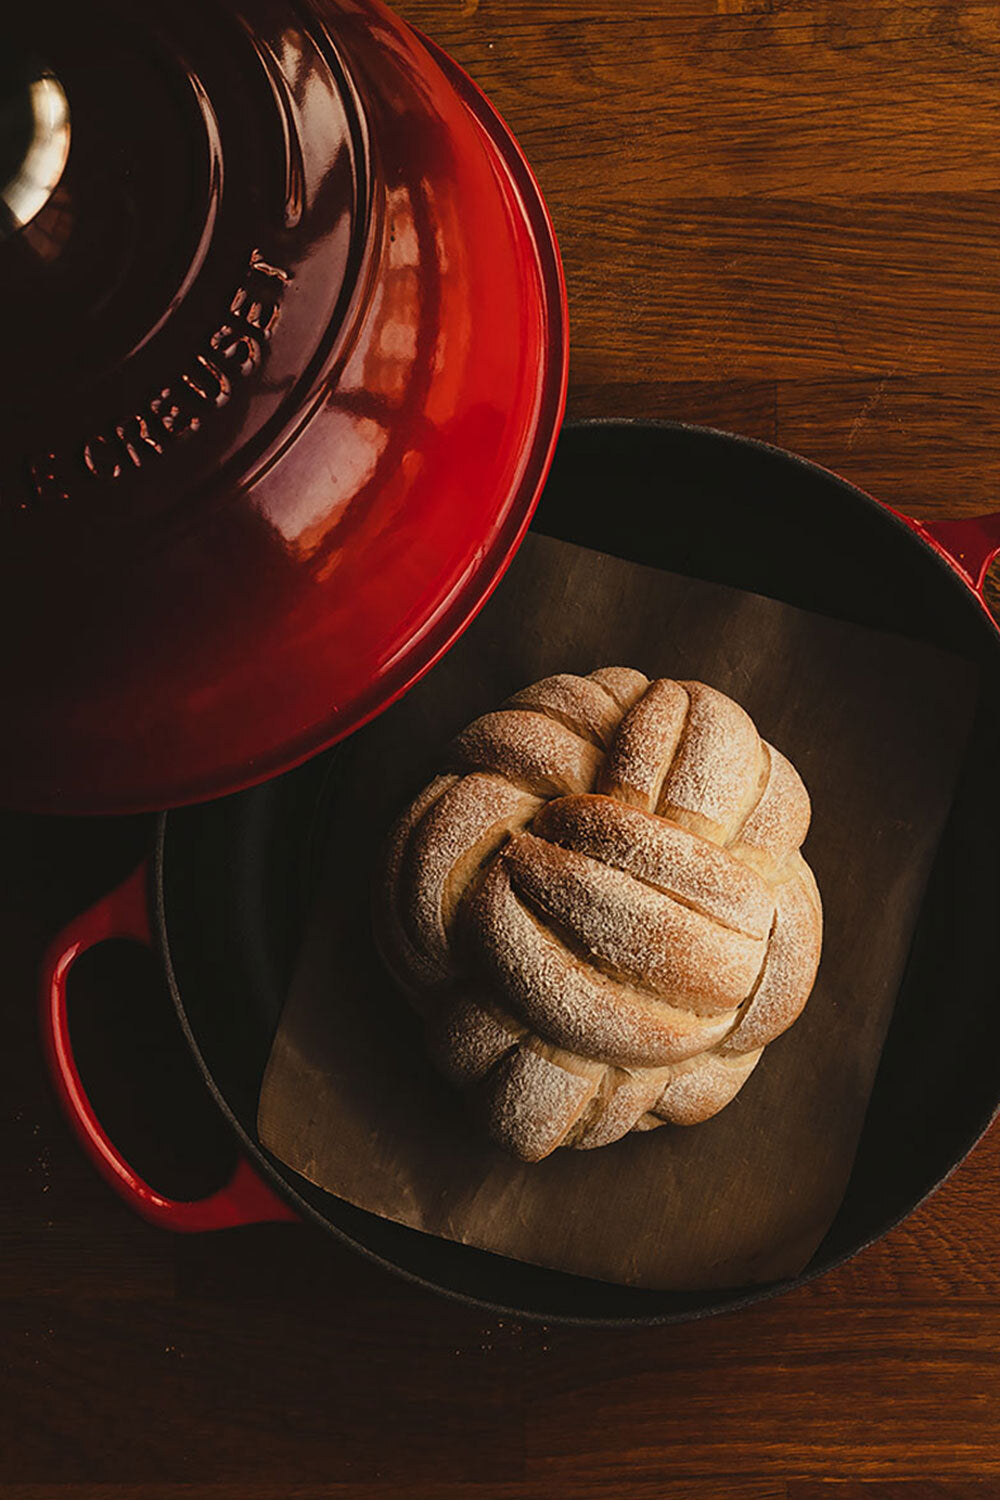
Baked - Option 2) Bake the ball bread in a cocotte oven for bread:
- If we use the Le Creuset bread cocotte oven , we can put a single 265 g loaf or make a larger loaf, with all the dough, and make better use of cooking time.
- Preheat the oven to 210ºC with heat up and down. Introduce the Le Creuset cocotte (base and lid) inside at the same time you turn on the oven to preheat. In order to cook bread inside it, it must be very hot.
- We will place it on the rack and in the lowest part of the oven, the last slot. The ideal is to preheat 20-30 minutes before introducing the breads.
- To bake a 265 g loaf: Open the cocotte oven, with the help of some gloves, remove the lid of the cocotte and place it on a wooden board.
- Put the ball bread in the Le Creuset cocotte, with baking paper or Teflon on the base, place the lid, put it inside the oven and close the door.
- Leave 10 minutes at 210ºC.
- After these first 10 minutes, we open the oven door, remove the lid of the cocotte with the help of some gloves and leave it on a wooden board.
- Finish cooking. Lower the temperature to 190ºC and finish cooking without a lid for 20 minutes.
- After this time, place at 190ºC with air and leave for 5 more minutes. In this way we favor the drying of the bread and we will improve the crust.
- Once you finish cooking, take it out and let it cool completely on a wire rack before opening it.
- If you prepare a bread with all the amount of dough that I leave you in the list of ingredients, you must cook it for 20 minutes with a lid at 210ºC, 25 minutes without a lid at 190ºC and 5 minutes with air at 190ºC.
Grades
- T45 flour is equivalent to a medium-strength wheat flour , with a W=280. The characteristic of this flour is that it has very good elasticity/extensibility.
- Can I elaborate the entire process followed without cold retardation? Yes you can. Following the same steps that I detail, only avoiding the step of retarding it in the refrigerator. Dividing the process into 2 days not only makes it more bearable, but also favors the appearance of very pleasant aromas and flavors due to a slow fermentation process.
- In case you want to carry it out with sourdough, it can be done without problems . The ideal is to add a maximum of 20-30% of sourdough with respect to the final weight of the flour used. Remember to remove the amount of flour and water from the final dough that we incorporate into the sourdough.
- To find out if our bread has finished its cooking time , you can do it by clicking with a digital thermometer and checking its internal temperature. It should be around 90ºC.
- The bread can be baked both in an oven tray, as a cocotte or on a steel plate. It is important that it has steam during the first minutes of cooking to favor its expansion.
- We can keep this bread in alinen bread bag for a maximum of 24-48 hours.
I am sure that you are going to enjoy a lot making this Bread Ball at home. Not to mention the wave that your friends and family are going to give you when they see it. They will surely hallucinate! And we are looking forward to seeing the result of those wonderful breads.


