
Many of us are eager to make our own bread at home, but we have many doubts about kneading for example (how to do it, how will I know it’s ready...), we don’t have the kitchen utensils needed or we’re not clear about some terms when we try to follow a recipe to make our homemade bread.
Virginia, author of the blog Sweet and Sour, has prepared this introduction to bread concepts for us. I dare say it’s a quick guide to learn all the basics! I suggest you read it carefully, and very soon we’ll give you a recipe so you can put into practice the knowledge you learn today. Enjoy!

Perhaps one of the things that holds us back most when we think about making bread at home is kneading. We’re afraid of not knowing, of getting it wrong, of having our hands full of dough and finding that an alien has invaded our kitchen.
It’s undeniable that good bread kneading requires practice, but it’s also true that it’s essential to be clear about a number of basic issues that will help us start our journey as home bakers on the right foot.
What does kneading bread mean? Kneading is the part of making bread that comes after mixing, and what we mainly do is develop the gluten contained in the flours, make the dough gain elasticity, and incorporate air. Ultimately it’s responsible, among other things, for creating the structure of the bread. For the dough to be able to withstand the tension that will be generated inside it with gas expansion.
There are certain flours that contain very little or no gluten and therefore those breads don’t require kneading, as is the case with 100% rye breads or breads made with gluten-free flours. In this case, a proper mixing and a fermentation time will do the job. But breads made with common wheat flour do require kneading.
What will indicate to us that the kneading of a wheat dough is correct? The windowpane test. It consists of taking a small piece of the dough we are kneading and stretching it between the fingers; if it’s properly kneaded it won’t break, but will stretch like chewing gum forming a small translucent membrane. This test will guide us about the kneading state of our dough.
However, if we are going to carry out a long cold fermentation, it won’t be necessary for the kneading to reach that level of perfection, since we should know that doughs also self-knead with resting.

What types of kneading can we do?
We can distinguish between kneading with a mixer or by hand.
If we have a stand mixer like Kitchen Aid, it’s perfect. It will allow us to mix with the paddle at low speed 1-2, and after obtaining a cohesive and homogeneous dough, knead with the dough hook, which twists the dough to develop the gluten, give it elasticity and fill it with air.

In this respect, keep in mind that no matter how much we put the dough hook in and turn on the motor, kneading doesn’t start until the dough gets caught on the hook.
Kneading time in the stand mixer is usually shorter than if we follow a manual technique, because the mixer is more vigorous and able to maintain constant intensity, which our arms are not.
Mixers save a lot of time, since they allow you to do other tasks while your bread is being kneaded. I make bread every week, and there are days when I either don’t feel like kneading or don’t have enough time, which is very common, but I still want to enjoy my homemade bread. In this case Kitchen Aid is my personal helper.But if you like to feel the dough in your hands and learn from it, or you don’t yet have a
mixer like a Kitchen Aid, you should know that there are two main types of manual kneading, depending on the type of dough we have obtained:The
traditional knead for a less hydrated dough, which will be pleasant and above all easy to knead, it won’t stick excessively to our hands.And
the French kneading, for a more hydrated dough, for the braver ones or for the more advanced home bakers.The manual technique
If we opt for the manual technique, first we proceed to mixing: in a large bowl, we add the basic ingredients of a bread, which are flour, yeast, water and salt. We mix well until obtaining a cohesive dough, from which we will begin kneading.
If we want to make kneading easier, however, I recommend mixing in two stages to practice what is called

autolyse. Mix at first only flour and water, cover and let rest for half an hour, and only then add the yeast and salt. This is what is called autolyse, which with the resting of the water-and-flour mixture, saves us effort in kneading, since based on a chemical reaction that occurs, the dough softens and prepares for easier and more comfortable kneading.With our dough ready, we now go to the actual kneading. If we have chosen to keep the dough less hydrated, it will be slightly non-sticky and will let us perform
traditional kneading: on a lightly floured surface, we place our dough. With one hand we will stretch it to fold it over itself so it traps air. We will turn the dough a quarter turn and repeat the operation, stretching and folding, and so on.If we have chosen to add more water and leave a more hydrated dough, it will be stickier, so we’ll use

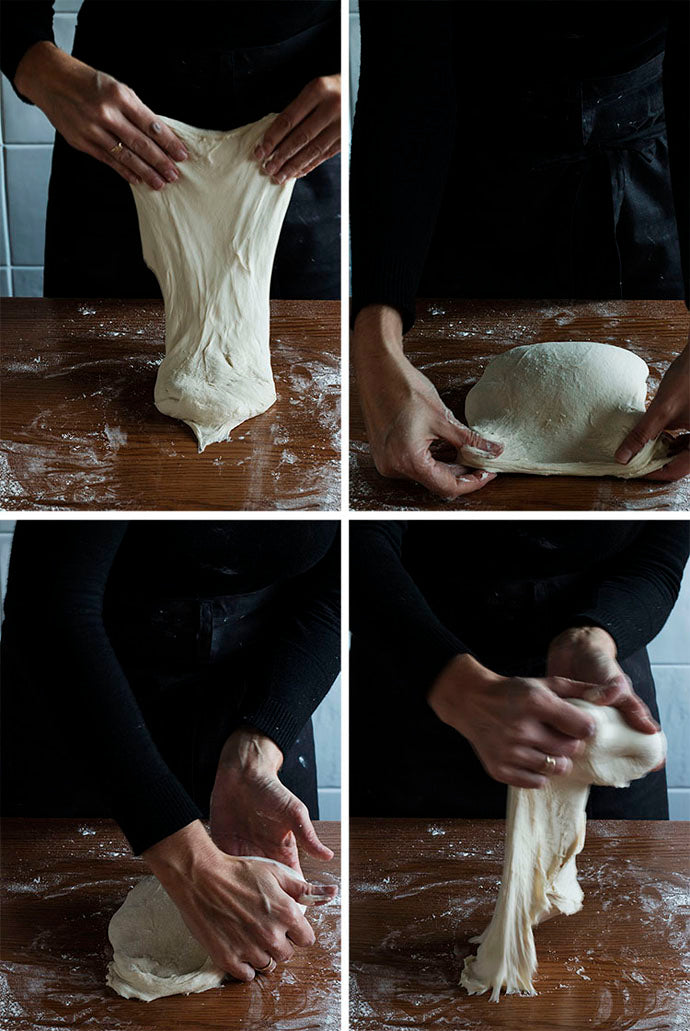
the French kneading techniqueIt consists of taking the dough with the hands like shovels in the air, and with a sharp strike on the table, stretching it (photo 1), folding it over itself so it traps air (photo 2 right), picking it up by the side again with the hands like shovels (photo 3) and lifting it (photo 4) to repeat the operation, stretching it again with a sharp strike on the table.:
In both cases we can knead directly for about 10 minutes, or make short kneadings of 1 minute and five minutes of rest, two or three times. As explained, during resting a kind of
self-kneading occurs.
The dough we should obtain will be smooth, soft and elastic, like the one shown in the image.

Fermentation
After kneading, we must let the dough ferment, so that the yeast does its job and develops it. As a rule, two fermentations are carried out, the initial and the final, the latter with the bread already shaped in its final form.
In this regard, for less hydrated doughs that incorporate sourdough starter, banettons are usually used, which are wicker or paper pulp baskets that help preserve the shape of the doughs, since doughs prepared with sourdough starter usually don’t have the strength of those that include yeast and have difficulty maintaining shape during proofing. They are also used to leave beautiful patterns on the crust that would otherwise be impossible.
To use a banneton you must bear in mind that it must be thoroughly floured, because otherwise the dough could stick and tear when removing it, with the consequent loss of air. They are not recommended for very hydrated doughs, because no matter how well they are floured, with so much moisture they tend to stick.

After fermentation, you only need to bake, and you’ll have your bread ready and the house filled with that traditional aroma of freshly baked bread. Keep in mind that fermentation and baking times will vary depending on the recipe you choose (types of flour, quantities...).
If you want to know more about bread, I recommend the go-to book Pan Casero by Iban Yarza, essential for all bread bakers. Soon, a recipe from the book here on the blog.


Comments
Angela (www.postresdelocura.com) said:
Fantástico el post de Virginia, yo soy una de esas personas a las que le encantaría hacer su propio pan, pero mis conocimientos sobre el tema aún no son los suficientes. Pero hoy podido aclarar varias dudas y además las fotos son de gran ayuda para ver la textura que debe ir adquiriendo la masa. Gracias!